Credit: Maxroll and Rhykker
Advertisement
Following significant changes in Diablo 4's New Season 2, which introduced massive patch notes and overhauled core systems like resistance, we are now a week into the gameplay. The season theme emphasizes more powers and reworks.
Before the season began, there was a lot of speculation and theory-crafting. Now, after a week and a half, we can see how things have settled.
a renowned Diablo content creator, we delve into the top 10 best builds for Season 2. These builds, barring any new discoveries or unexpected changes, are anticipated to persist as the optimal choices for the remainder of the season.
Advertisement
10. Flurry Rapid Fire Rogue


Strength: 7
Dexterity: 10
Intelligence: 7
Willpower: 8
At the 10th spot, we feature the Flurry Rapid Fire Rogue. We're encompassing several variations for our 10th build. Primarily, we're focusing on the rapid-fire Rogue. Additionally, we're discussing the Flurry Rogue, which utilizes rapid fire to compensate for its single-target damage. There's also the penetrating shot Rogue, which similarly relies on rapid fire for single-target damage, and the new rain of arrows Rogue, which integrates rapid fire into its build.
The rapid-fire build proves effective in nearly all scenarios, delivering incredible single-target damage. Conversely, the flurry rapid-fire build uses flurry for widespread area damage, then switches to rapid fire for cleanup. The penetrating shot Rogue excels at clearing larger areas and then switches to rapid fire. As for the rain of arrows variant, it relies on the new flicker step unique to minimize downtime on the ultimate rain of arrows, ensuring consistent, significant area-of-effect damage.
For all these variants, build guidance is available for maximizing their potential.
Advertisement
Best-in-Slot Vampiric Powers:
Moonrise (Major): Adding a Basic Skill to the rotation, this power offers significant benefits.
Accursed Touch (Major): Triggers and spreads the Vampiric Curse, providing additional effects.
Prey on the Weak (Minor): Guarantees a high vulnerable duration, enhancing Improved Rapid Fire and boosting our damage.
Hemomancy (Minor): Occasionally deals AoE damage while healing you.
Infection (Minor): Due to the frequent hits, this consistently triggers for extra damage
Skills:
Our preferred Basic Skill, Puncture, is used to accumulate Combo Points and apply Vulnerable and Slow debuffs. Its primary function lies in utility rather than damage.
Flurry acts as our primary damage-dealing ability. It's a straightforward skill that delivers four hits in a frontal cone. By using Encircling Blades, it transforms into a full 360° area-of-effect attack.
Rapid Fire serves as our secondary damage ability, specifically effective against significant single targets such as elite enemies and bosses, where Flurry faces limitations. Although it targets just one enemy, it significantly speeds up certain encounters.
Dash and Shadow Step grant remarkable mobility, allowing swift movement across the battlefield. Additionally, Shadow Step assists in escaping from crowd control effects.
The final slot is occupied by Shadow Imbuement. Activating this skill enhances Flurry by converting it into Shadow damage. It also infects enemies struck, causing them to explode upon death. This ability proves beneficial in clearing groups of monsters when facing multiple enemies.
Advertisement
Passives:
Close Quarters Combat stands as our primary chosen Key Passive. Gaining bonuses is simple as Puncture falls under the Marksman skill, while Flurry is categorized as a Cutthroat skill.
Upon obtaining Penitent Greaves, Stutter Step is substituted by Frigid Finesse, resulting in increased damage output.
Endgame Gear:
In this configuration, you gain access to all Legendary Aspects, enabling a more robust version of this build. Extra Legendary Aspects occupy slots that might later be replaced with Unique items. If you feel vulnerable, consider adding the Umbrous Aspect to the Amulet.
Several other tweaks complete the build.
Focus on acquiring items that feature the 'Damage to Crowd Controlled Enemies' stat to enhance the effectiveness of the Close Quarters Combat Key Passive.
Begin by aiming to max out your resistances, aiming for a 70% cap for each.
Build Scaling Damage:
Damage to Crowd Controlled Enemies: This stat becomes a potent damage multiplier thanks to Close Quarters Combat.
Combo Points: Utilizing Combo Point Specialization allows you to use Puncture up to three times to enhance your next Flurry or Rapid Fire. This effect is further boosted by Condemnation and Aspect of the Expectant. Leveraging the Rapid Aspect facilitates quicker Combo Point accumulation, which helps maintain high Energy for the Edgemaster’s Aspect.
Critical Strikes: Enhance your Critical Strike Chance through various means such as specific rolls on Gloves & Rings, Concussive effects, Precision Imbuement, and Intelligence. This complements the Combat Glyph for increased efficiency.
Vulnerable: Acquire a significant portion of Vulnerable Damage from your Weapons & Rings, including the Crossbow base, and apply the debuff using methods like Puncture, Improved Flurry, and Exploit Glyph.
Advertisement
Build Scaling Defence:
Resistances: In the late game phase, we aim to reach a 70% cap for all elemental resistances. Achieving this is through strategic rolls on Armor pieces, Paragon nodes, and Jewelry sockets.
Armor: Similar to resistances, our goal is to reach an 85% damage reduction cap (~9200 vs. lvl 100 monsters, ~13500 vs. lvl 154 monsters) to protect against various damage types effectively.
Defensive Aspects: Both Aspect of Might and Cheat's Aspect are excellent for defense since they are active when you're attacking and have access to Crowd Control abilities.
Stack Defensive Stats on Chest and Pants: These slots provide maximum protection, which might be hard to obtain elsewhere. If you're feeling vulnerable, consider bolstering your character's defensive stats in these areas.
Utilities: Mangler's Aspect is beneficial for crowd control, assisting in survival. The Evade and Advanced Flurry combination also plays a significant role in your defense.
Healing: Flurry provides inherent healing supported by Enhanced Flurry, further complemented by Siphoning Strikes for additional sustainability.
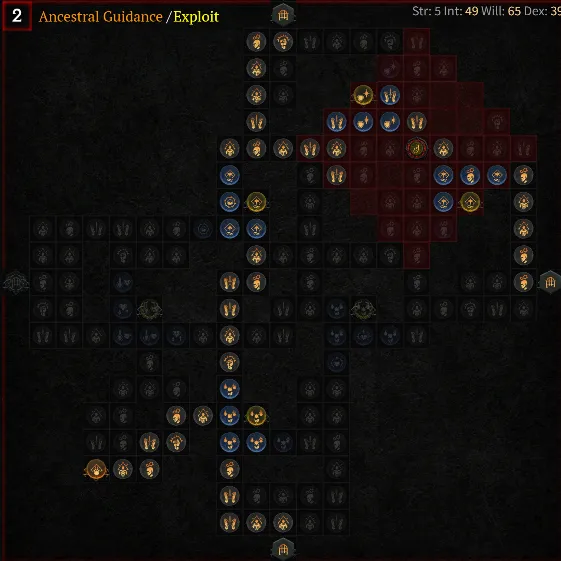
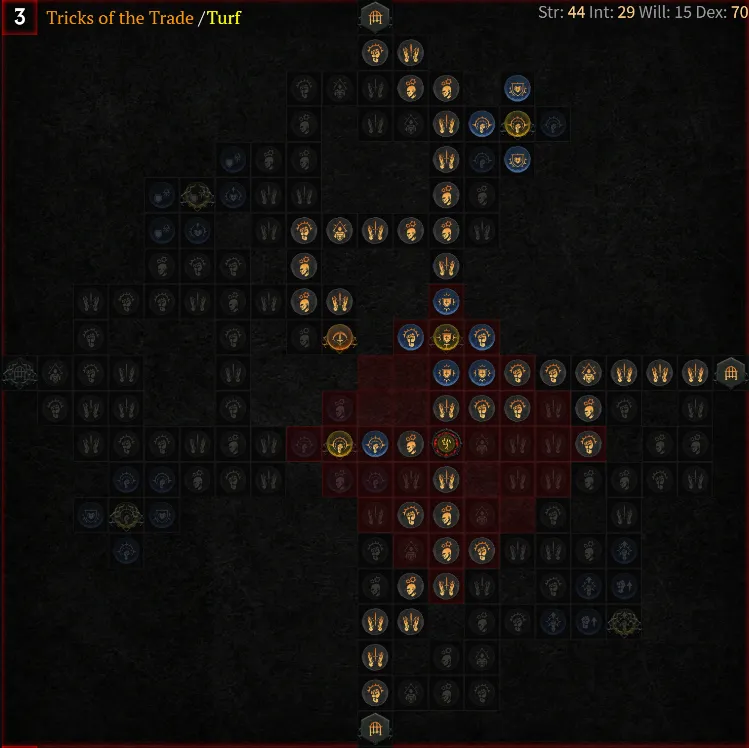
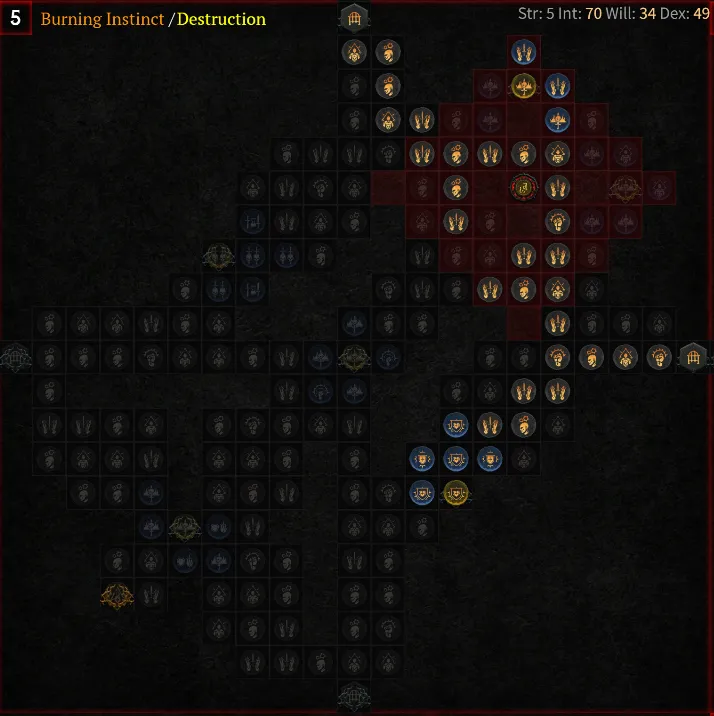
Paragon Board:
Advertisement
Advertisement
Advertisement
9. Werewolf Tornado Druid


Strength: 9
Dexterity: 7
Intelligence: 10
Willpower: 10
The Werewolf tornado druid build relies heavily on specific gear. When you have the necessary gear, playing this build is straightforward. The strategy involves continuously casting tornadoes. To execute this, you'll require a tempest Roar and your basic storm skills, which are also werewolf skills. Additionally, the direwolf's offensive aspect is crucial. It alters grizzly rage, turning you into a dire werewolf instead of a werebear. This transformation grants a 50% Spirit cost reduction bonus, allowing you to cast tornadoes more frequently.
With the combination of Tempest Roar and a Lucky hit, storm skills can provide up to a 25% chance to grant four Spirit. This synergy ensures you won't easily run out of Spirit.
Advertisement
Best-in-Slot Vampiric Powers:

Ravenous - As endgame werewolf builds often hit the 200% movement speed cap, this Power becomes an obvious choice, granting up to an 80% increase in Attack Speed when active!
Anticipation - Given our heavy reliance on the combination of Grizzly Rage and Dire Wolf's Aspect for substantial Spirit Cost Reduction and Movement Speed, maintaining uptime on our Ultimate skill is crucial.
Prey on the Weak - While offering a reliable damage bonus, when used alongside other Vampiric Powers capable of inflicting a Curse, this Power becomes a consistent source of Vulnerable.
Metamorphosis - This Power ensures a steady source of Unstoppable, inflicts moderate damage, and serves as the primary means of applying Vampiric Curses.
Sanguine Brace - This Power aids in consistent Fortify generation and offers a healthy increase in Critical Strike Chance, significantly boosting damage.
Advertisement
Skills:
Tornado serves as the primary damage skill in this setup.
Wind Shear: generates Spirit from a distance, offering Movement Speed, a source of Vulnerability, and Damage Reduction when using Might.
Hurricane: provides excellent utility by slowing down enemies, reducing their damage, and stacking up Rampaging Werebeast's Critical Strike Damage.
Grizzly Rage: delivers escalating Damage over its duration and, combined with Rampaging Werebeast, offers a brief period of Unstoppable. It effectively resolves Spirit cost concerns when used with Dire Wolf's Aspect.
Blood Howl's Attack Speed bonus enables the deployment of multiple Tornadoes and acts as a reliable source of healing, as its Cooldown resets with kills.
Cyclone Armor: provides substantial Damage Reduction, progressively strengthening through Preserving Cyclone Armor.
Passives:
Perfect Storm ensures consistent Spirit sustain and damage output.
Once you obtain Tempest Roar, a single point in Toxic Claws enables effective Crowd Control with Neurotoxin. It activates Envenom's damage bonus and leverages Damage to and Damage Reduction from Poisoned enemies
Endgame Gear:
Your go-to helmet choice should be Tempest Roar.
Dire Wolf's should find its place on your Amulet to maximize Spirit Cost Reduction and Movement Speed.
Utilize Stormchaser's, Accelerating, Nighthowler's, and Rampaging Werebeast interchangeably across your Rings, Weapon, Off-Hand, and Gloves.
Replace Sapphires in your Weapon and Off-Hand with Emeralds. With the introduction of Raging Tornado, you'll have increased uptime on Vulnerable rather than Crowd Control, especially during boss encounters.
The Pants and Chest slots offer some flexibility and don't necessarily require full defensive items to handle all content:
Consider Mad Wolf's Glee as a potent offensive choice that also enhances your Movement Speed.
In season 2, the preferred offensive choice is Tibault's Will, as we can maintain unlimited Unstoppable from Metamorphosis.
If you lack these Unique items, play Hardcore mode, or prefer a more defensive setup, you can interchange Disobedience and Vigorous on these defensive pieces
Build Scaling Damage:
Lucky Hit Chance: Our reliance on Lucky Hit Chance is significant in reducing the cooldown of Grizzly Rage with Calm Before the Storm. It triggers Spirit generation through Tempest Roar and healing via Masochistic. In Season 2, Lucky Hit also amplifies the Ravenous and Accursed Touch Vampiric Powers.
Spirit: With Dire Wolf's Aspect on your Amulet offering up to 75% Spirit Cost Reduction, in combination with Lust for Carnage, Tempest Roar, and Reclamation, a substantial portion of your Resources gets restored. Consider adding more Spirit Cost Reduction on your Amulet, Boots, and Off-Hand, or opt for Resource Generation on your rings if needed.
Critical Strikes: While there isn't a guaranteed method for Critical Strikes in this build, stacking Critical Strike Chance on Rings, Gloves, and Totem proves beneficial to capitalize on the Rampaging Werebeast's Critical Strike Damage boost.
Vulnerable: Exploit Glyph and Tornado provide Vulnerable procs. In Season 2, the Prey on the Weak Vampiric Power can additionally activate and reinforce the damage of Vulnerable. Despite a decrease in its power, this multiplier remains a convenient tool to activate.
Crowd Controls: Through the combination of Toxic Claws and Neurotoxin, every Critical Strike slows enemies for 4 seconds. Implementing Damage affixes that deal extra damage against Crowd Controlled or Slowed Enemies offers an effective way to increase your damage output.
Envenom: Leveraging the potent offensive passive Envenom is made possible thanks to Toxic Claws, which poisons enemies whenever Critical Strike Damage is dealt to them.
Advertisement
Build Scaling Defence:
Avoid Getting Hit: Utilize your range advantage to attack foes from a distance. Employ stutter stepping at the edge of your range to evade most incoming enemy projectiles.
Fortify: While you consistently generate Fortify from Grizzly Rage, gaining the Fortified status becomes challenging due to the continuous healing from Masochistic and Circle of Life. In Season 2, the Sanguine Brace significantly mitigates this issue.
Armor: Your armor is a substantial part of your defenses. The Aspect of Disobedience significantly bolsters its effectiveness. Ensure your gear and Paragon Boards provide ample Armor.
Unstoppable: Grizzly Rage briefly grants Unstoppable status upon activation, our only source. In Season 2, the Metamorphosis Vampiric Power helps bridge this gap.
Venomwall: Leverage the potent defensive boost of Venomwall with Toxic Claws. This power poisons foes whenever you deal Critical Strike Damage.
Resistances: We attain maximum Resistances using a mix of methods, including Intelligence from Paragon, Ring and Amulet implicits, Ancestral Fortitude, Poison Resilience, Lightning Resilience, Resolve on the Starter board, Tempest Roar's Poison Resistance, two boot affixes (Cold, Fire, or Shadow), two Royal gems corresponding to the remaining Resistances, and a single Royal Topaz.
Advertisement
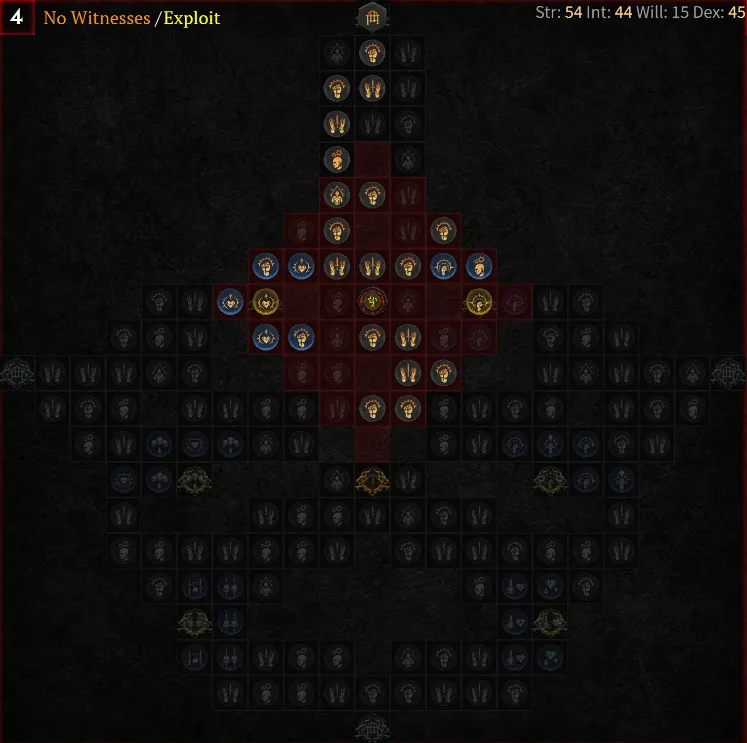
Paragon Board:

Advertisement
8. Death Blow Barbarian


Strength: 10
Dexterity: 8
Intelligence: 7
Willpower: 7
Introducing the Death Blow Barbarian build, known as the Walking Arsenal. Death Blow is incredibly powerful in Season 2, especially when paired with the unique item 'Overkill.' This item creates a shockwave dealing 38% of its base damage to enemies. Notably, enemies that perish from this effect reset Death Blow's cooldown. Essentially, we're transforming Death Blow, originally a strong single-target skill, into a multi-target skill for maximum effectiveness.
To optimize this build, it involves managing various skills. The Walking Arsenal passive boosts your damage by 10% for 8 seconds when dealing direct damage with specific weapon types. When all three damage bonuses are active, an additional 15% damage bonus is gained. Incorporating the Earth Striker aspect, after swapping weapons eight times, your next skill deals 50% increased overpower damage.
When these elements align, your Death Blows can potentially eliminate Elites and even bosses in a single strike. If you seek to defeat the most powerful bosses with just one hit, this build could be your solution.
Advertisement
Best-in-Slot Vampiric Powers:
Moonrise (Major) - Significantly boosts Attack and Movement Speed.
Call Familiar (Major) - Constantly summons a familiar due to frequent use of Death Blow.
Hemomancy (Minor) - Provides AoE explosion and healing effects.
Anticipation (Minor) - Reduces the cooldown of our Ultimate ability for more frequent activation.
Ravenous (Minor) - Consistently offers a substantial Attack Speed boost for increased damage output.
Skills:
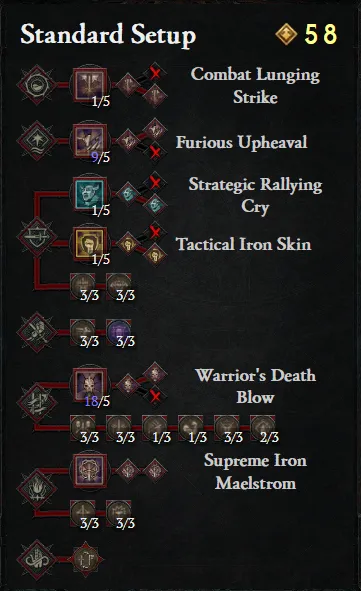
Lunging Strike: This skill bestows Berserking, activates the Dual-Wield buff for Walking Arsenal, and enhances our movement speed.
Upheaval: Our primary choice for a core skill, providing the Two-Handed Bludgeoning buff for Walking Arsenal. It excels in dealing with groups of enemies, applying Vulnerable through the Exploit Glyph & Expose Vulnerability.
Death Blow: As our third attack, it grants the Two-Handed Slashing buff for Walking Arsenal. This skill delivers significant single-target burst damage and resets its cooldown upon enemy elimination, while also bestowing the Berserking buff. When paired with Overkill, it transforms into a formidable AoE attack for clearing monster packs.
Iron Skin: Employed alongside Aspect of the Iron Warrior, it bolsters our defenses and offers a source of Unstoppable.
Rallying Cry: Providing a secondary source of Unstoppable, this skill helps prevent frequent crowd control and contributes to our Fortify generation.
Iron Maelstrom: Our Ultimate Skill, used for swiftly eliminating large groups of monsters. Its cooldown resets rapidly through weapon swapping, thanks to the Supreme Iron Maelstrom upgrade.
Advertisement
Passives:
Pit Fighter: Offers a slight damage boost and reduces ranged damage.
Counteroffensive: Provides a multiplicative damage boost when Fortify is active, which should be most of the time.
Heavy Handed: Amplifies our total Critical Strike Damage while wielding a Two-Handed Weapon.
Expose Vulnerability: Enables continuous application of Vulnerability by combining Death Blow and Upheaval.
Imposing Presence, Martial Vigor, Aggressive Resistance, and Defensive Stance: Enhance our survivability.
Brute Force: Enhances Overpower synergy for potential one-shot capability against bosses.
Swiftness: Improves movement speed for better agility.
Advertisement
Endgame Gear:
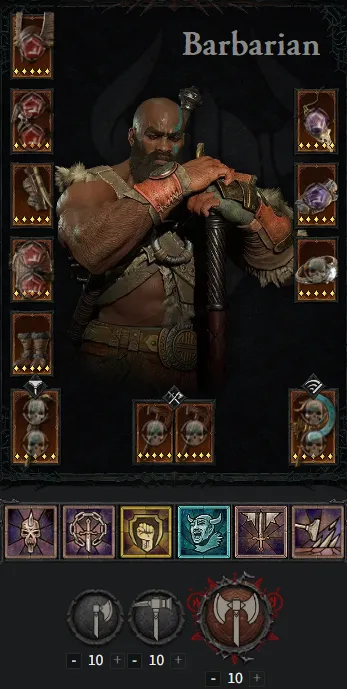
In this setup, having access to all Legendary Aspects empowers a much stronger version of this build. Additional Legendary Aspects fill slots that may be replaced with Unique items in the future.
At this stage of progression, focus on utilizing well-rolled Aspects on gear pieces that won't be replaced in the near future. If these Aspects don't significantly boost the build, it's reasonable to save them for endgame gear pieces.
Our initial Two-Handed Aspect, Encroaching Wrath, ensures smooth Boss fights.
For the second Two-Handed Aspect, you have the option of choosing either Accelerating (for smoother gameplay) or Edgemaster’s (for more significant hits). Select the one that best suits your style of play.
Weapon Master's ensures that we don't encounter issues with Death Blow going on cooldown during regular combat.
Steadfast Berserker's grants substantial Fortify, providing damage reduction and synergies with other abilities.
Begin the process of capping your Resistances and enhancing your base Armor value as much as possible for improved defense.
Advertisement
Build Scaling Damage:
Lucky Hit Chance: Our reliance on Lucky Hit Chance is significant in reducing the cooldown of Grizzly Rage with Calm Before the Storm. It triggers Spirit generation through Tempest Roar and healing via Masochistic. In Season 2, Lucky Hit also amplifies the Ravenous and Accursed Touch Vampiric Powers.
Spirit: With Dire Wolf's Aspect on your Amulet offering up to 75% Spirit Cost Reduction, in combination with Lust for Carnage, Tempest Roar, and Reclamation, a substantial portion of your Resources gets restored. Consider adding more Spirit Cost Reduction on your Amulet, Boots, and Off-Hand, or opt for Resource Generation on your rings if needed.
Critical Strikes: While there isn't a guaranteed method for Critical Strikes in this build, stacking Critical Strike Chance on Rings, Gloves, and Totem proves beneficial to capitalize on the Rampaging Werebeast's Critical Strike Damage boost.
Vulnerable: Exploit Glyph and Tornado provide Vulnerable procs. In Season 2, the Prey on the Weak Vampiric Power can additionally activate and reinforce the damage of Vulnerable. Despite a decrease in its power, this multiplier remains a convenient tool to activate.
Crowd Controls: Through the combination of Toxic Claws and Neurotoxin, every Critical Strike slows enemies for 4 seconds. Implementing Damage affixes that deal extra damage against Crowd Controlled or Slowed Enemies offers an effective way to increase your damage output.
Envenom: Leveraging the potent offensive passive Envenom is made possible thanks to Toxic Claws, which poisons enemies whenever Critical Strike Damage is dealt to them.
Build Scaling Defence:
Enhancing Damage Reduction:
We secure diverse forms of damage reduction via gear rolls, including:
General Damage Reduction
Damage Reduction when Fortified
Damage Reduction from Nearby Enemies
Damage Reduction from Bleeding Enemies
Pit Fighter offers marginal Distant Damage Reduction.
Combining Iron Skin with Aspect of the Iron Warrior.
Aspect of Might reduces damage after executing Lunging Strike.
Advertisement
Fortification:
Maintaining Fortify grants a fundamental 10% damage reduction. We employ Steadfast Berserker's Aspect to generate Fortify during Berserking. Undaunted further augments Damage Reduction while Fortified.
Armor & Resilience:
Resilience: In our journey to late game, we focus on achieving 70% elemental resistance through gear rolls, Paragon nodes, and Jewelry sockets. Armor: Aligning with our resilience approach, we aim to reach an 85% damage reduction armor cap (~9200 vs. lvl 100 monsters, ~13500 vs. lvl 154 monsters) to counter any damage type. Some setups also include Aspect of Disobedience. % Total Armor is available on Helmet, Chest Armor, Pants, and Amulet.
A combination of Iron Skin with Aspect of the Iron Warrior. Our Unstoppable abilities enable us to avoid or break through various enemy Crowd Control effects. Thanks to these skills, we maintain consistent high uptime on this capability.
Advertisement
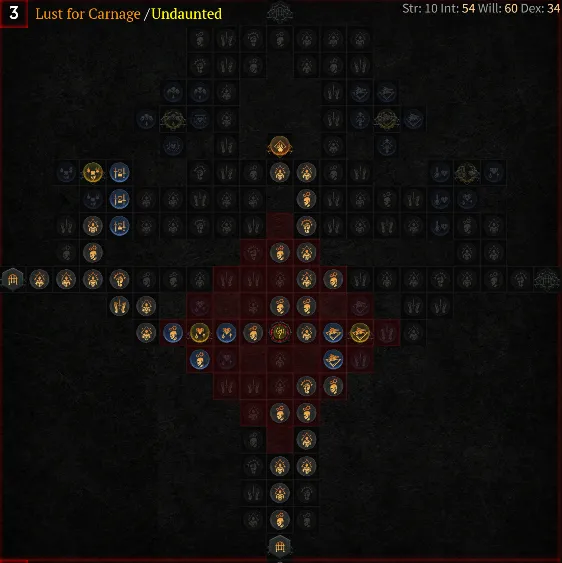
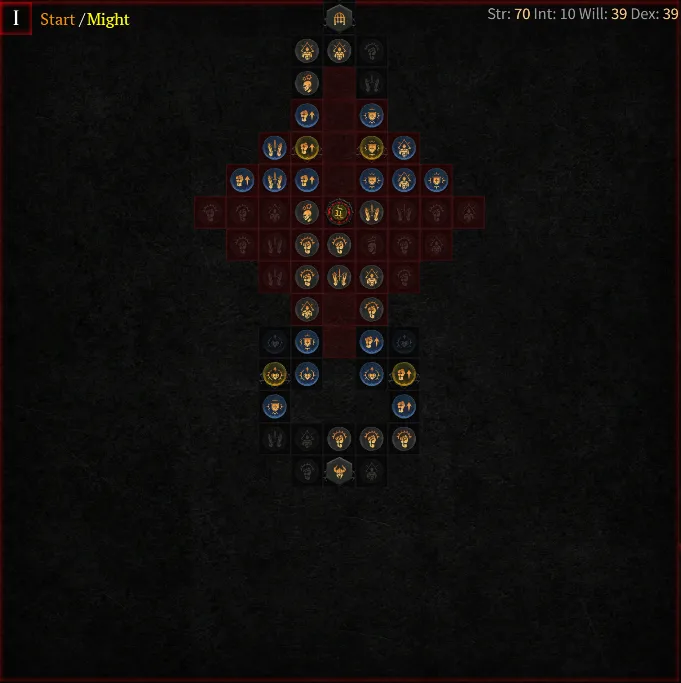
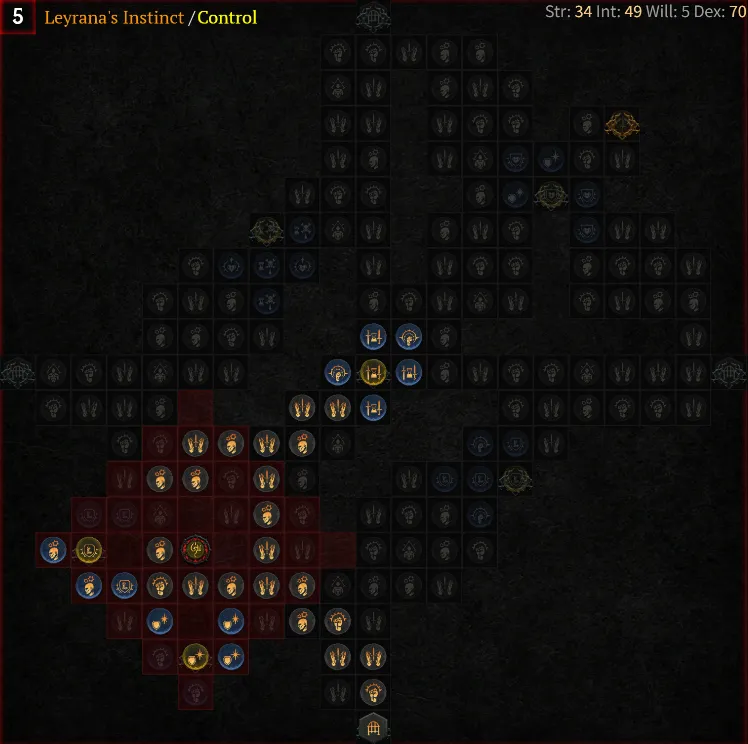
Paragon Board:

Advertisement
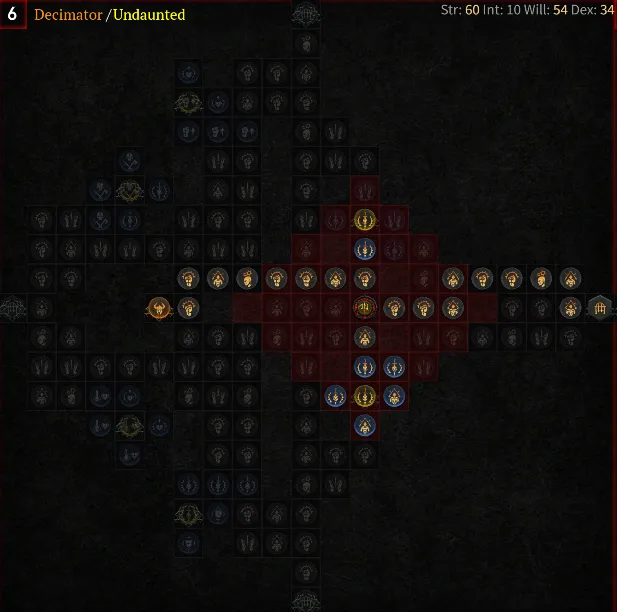
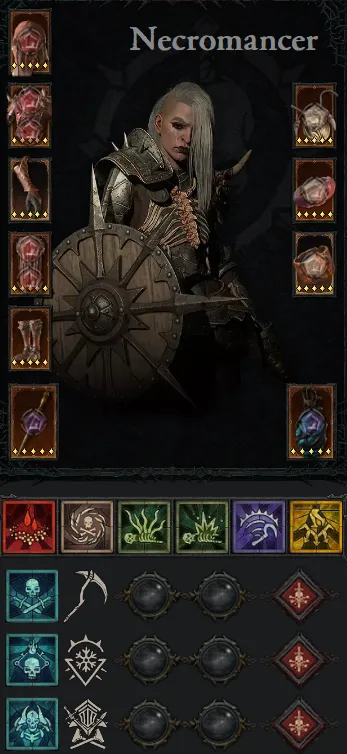
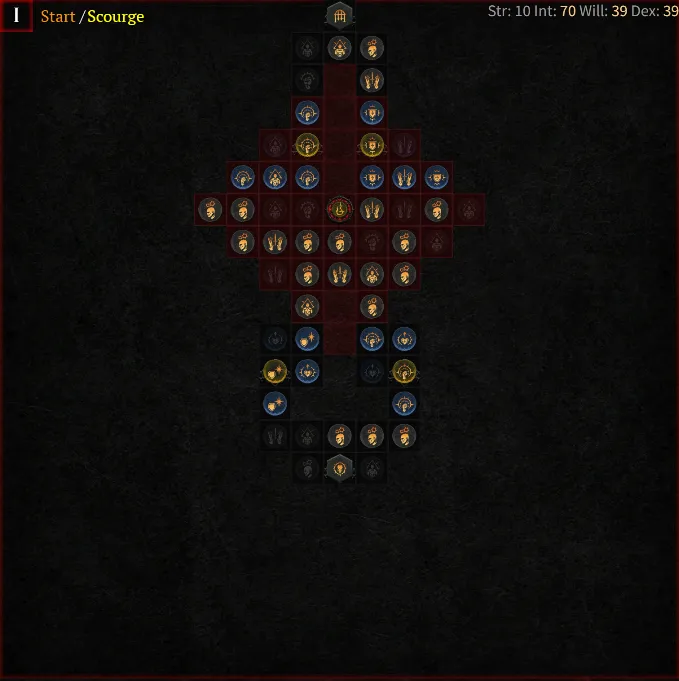
7. Blood Lance Necromancer


Strength: 9
Dexterity: 7
Intelligence: 12
Willpower: 8
The Bone Spear Necromancer build encountered a setback, and while still viable, we currently favor the Blood Lance for its efficiency. Blood Lance's popularity is rising, benefitting notably from the Season 2 improvements, especially the buff to overpower. This build stands out for its remarkable damage output and exceptional durability, making it the tankiest Necromancer build.
Blood Lance is exceptionally spam-friendly, consuming minimal Essence, allowing players to continually cast it at will. However, it is a build that heavily relies on specific gear, and its mechanics might seem a bit complex to grasp at first.
Advertisement
The unique mechanics of Blood Lance involve striking enemies with the Lance, which remains embedded for three seconds. Subsequently hitting another enemy with a new Lance causes all targets with existing Lances to suffer additional damage. This shared damage among previously lanced targets can also trigger various effects from aspects, skills, and paragon traits. Contrary to conventional strategies, this build emphasizes spreading the damage across multiple enemies quickly instead of focusing on a single target.
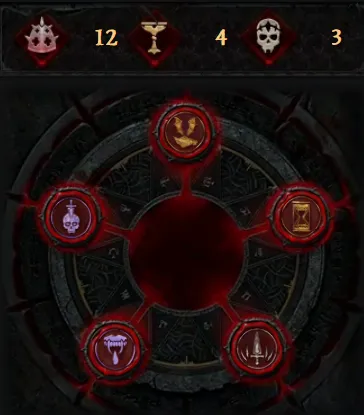
Best-in-Slot Vampiric Powers:
Moonrise (Major) - Significantly boosts Attack and Movement Speed.
Call Familiar (Major) - Constantly summons a familiar due to frequent use of Death Blow. Hemomancy (Minor) - Provides AoE explosion and healing effects.
Anticipation (Minor) - Reduces the cooldown of our Ultimate ability for more frequent activation.
Ravenous (Minor) - Consistently offers a substantial Attack Speed boost for increased damage output.
Skills:
Hemorrhage: With its bonus Attack Speed, this skill generates a high amount of Essence and produces multiple Blood Orbs, triggering various advantages.
Blood Lance: Pierces through targets, dealing damage to all Lanced enemies every time it hits a new enemy, including Overpower Damage.
Blood Mist: Acts as a safety net and becomes an excellent mobility option later on, particularly with specific Aspects.
Decrepify: Slows enemies, decreases incoming damage, stuns, and reduces our Cooldowns via Lucky Hit mechanics.
Corpse Tendrils: Among the most effective crowd control options available, while also generating numerous Blood Orbs for additional benefits.
Bone Storm: Provides a reliable source of Barrier to maximize our Fortified status, along with added Damage Reduction.
Passives:
Rathma's Vigor: Provides an additional source of Overpower procs every 12 seconds. Healing with Blood Orbs reduces the time between Overpower procs.
Drain Vitality: Enables swift stacking of Fortify to boost your Overpower Damage output and reduce incoming damage.
Advertisement
Transfusion: Unfortunately, this skill does not significantly enhance our effectiveness at any stage of the game, leading to its exclusion from the build.
Endgame Gear:
In this stage, having access to all Legendary Aspects and Unique items elevates the Blood Lance Necromancer to its most potent form. Expect some intensive grinding to obtain these highly desired items!
Advancing to the Late Endgame version of the build involves replacing current gear with higher Item Power, seeking ideal affix combinations, and upgrading Aspects to perfect versions of the same Aspects.
Introducing the Banished Lord's Talisman, a component that synergizes with Overpowering, necessitates adjusting several Aspects.
Aspect of Rathma’s Chosen remains a vital part of the build, prompting the removal of Sacrificial Aspect, considered the least critical Offensive Aspect.
By transitioning to a 1-Handed Sword and Focus setup, an Aspect slot becomes available for Aspect of Hungry Blood or more desirable gear affixes.
Book of the Dead introduces a significant alteration in shifting from Golem Sacrifice to Golems - Iron, prioritizing the enhancement of Critical Strike Damage to optimize overall output.
Build Scaling Damage:
Overpower: It calculates its bonus damage by reading your current Life and Fortify value. To achieve maximum damage output, it's essential to stack Maximum Life and Fortify Generation. Additionally, prioritize Overpower Damage on gear and within the Paragon boards for an additive boost.
Crowd Controls: Employing crowd control techniques and pulling monsters directly scales the damage. This strategy not only maximizes our paragon board bonuses but also allows for more attacks before Overpower procs.
Attack Speed: A boost in Attack Speed contributes to faster Essence generation by reducing the animation length on our generators. It quickens the time taken for Tendrils to appear and speeds up the casting of Blood Lance. It's considered one of the most valuable stats on our gear and in the Paragon after Maximum Life.
Advertisement
Critical Strike/Vulnerable: These sources activate powerful 1.5 and 1.2 multipliers, essential for the build. Meeting these requirements also triggers additional multipliers within the build.
Build Scaling Defence:
Avoiding Damage:
Utilize your range advantage and keep enemies at a distance. By using stutter steps at the edge of your range, you can dodge most incoming projectiles.
Armor: A substantial portion of your defense relies on Armor. Employing the Aspect of Disobedience can significantly enhance its effectiveness. Ensure you maximize the Armor on your gear.
Damage Reduction: This stat is crucial after Armor. With an easy way to maintain the Fortified status, Damage Reduction while Fortified becomes a formidable survivability factor, complementing other forms of Damage Reduction.
Unstoppable: Blood Mist is the sole source of Unstoppable for this build. Cooldown Reduction is crucial to increase the frequency of this defensive mechanic.
Fortify: While dealing damage, Drain Vitality fortifies you naturally, but it isn't always reliable in sustaining full Fortify. Blood-drinker converts the Orbs produced by Corpse Tendrils and Hemorrhage into a consistent source of Fortify.
Healing: Blood Orbs serve as potent tools for continual healing, providing excess healing in particular skill and aspect interactions.
Advertisement
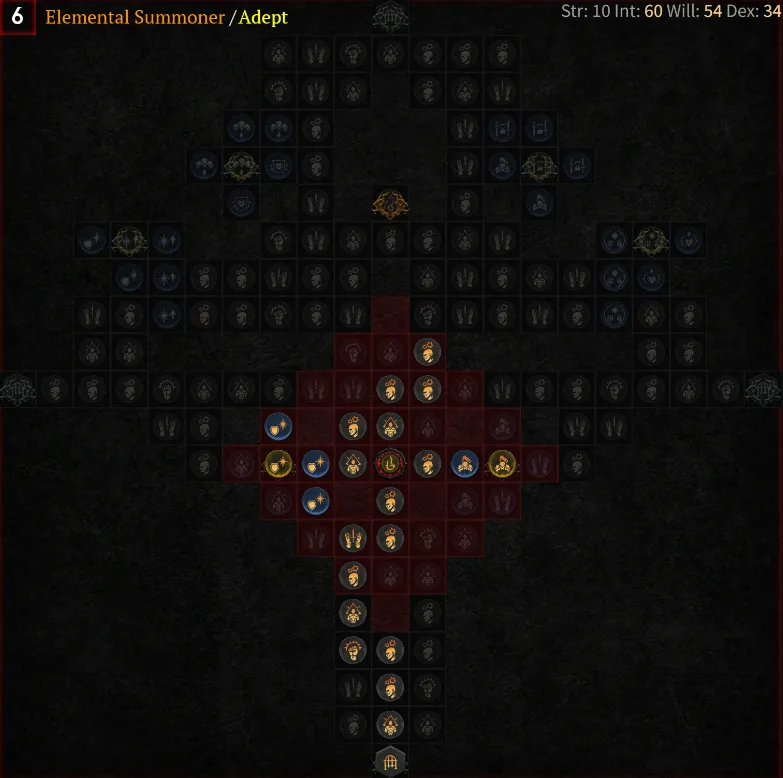
Paragon Board:
Advertisement
6. Arc Lash Sorcerer


Strength: 7
Dexterity: 7
Intelligence: 10
Willpower: 8
Season 2 has seen a shift in the sorcerer build landscape. While Arlash Call sorcerers are no longer in vogue, Lightning sorcerers have taken the spotlight. Arlash stands out as a generator build, alleviating concerns about Resource Management since you can freely spam Arlash, dealing substantial damage. However, it's essential to note that Arlash is a melee-range build, thus emphasizing the incorporation of numerous defensive abilities for self-preservation.
One intriguing aspect of this build is its gear requirement. While it's a mix of both challenging and easy to gear, it does not mandate specific aspects to function. Nonetheless, stacking particular affixes is crucial. Notably, a considerable emphasis on cooldown reduction and attack speed is recommended for optimal performance.
Best-in-Slot Vampiric Powers:
Advertisement
Ravenous (Minor) - Offers a significant boost in Attack Speed without any cost. Ideal for non-channeling builds.
Anticipation (Minor) - Reduces the cooldown of Unstable Currents by 20%, a straightforward enhancement.
Hectic (Minor) - An essential power for Basic Skill-focused builds. Substantially decreases all our cooldowns.
Metamorphosis (Major) - Applies Vampiric Curse and provides Unstoppable, offering a damage bonus through Tibault's Will.
Moonrise (Major) - Provides additional Attack Speed and augments Basic Skill Damage
Skills:
Advertisement
Arc Lash serves as our primary skill, offering decent damage while playing a pivotal role beyond its damage output. It boasts a rapid animation and double hits on Critical Strikes, ideal for activating various Lucky Hit effects, notably Ball Lightning Enchantment and Static Discharge. Additionally, the Cooldown Reduction from Glinting Arc Lash is invaluable in a build reliant on cooldown management.
Unstable Currents significantly enhances our build's damage potential. Casting a random Shock Skill each time Arc Lash is used more than doubles its damage and Lucky Hit Chance. The skill also grants a +25% Attack Speed, a crucial stat in this build. Overall, our damage output nearly quadruples when Unstable Currents is active. Hence, we aim to accumulate as much Cooldown Reduction as possible to use it more frequently.
Fireball and Ball Lightning are included solely for Enchantment Slots.
We utilize Destructive Charged Bolts to benefit from damage reduction when our Ultimate spell is cast.
Teleport acts as our primary mobility skill and a crowd control break.
Frost Nova serves both defensive and offensive purposes. It freezes enemies in place, providing safety, and significantly amplifies our damage output by applying the Vulnerable status to foes.
Ice Armor grants a substantial Barrier. As this skill lacks upgrades, we can reallocate points when an Amulet with Defensive Skill ranks is acquired.
Flame Shield adds further defense and offers healing properties to the build
Passives:
Conjuration Mastery significantly amplifies damage when our Ultimate skill summons multiple Lightning Spears.
Advertisement
Endgame Gear:

We incorporate Conceited, Overwhelming Currents, and Gravitational into the previously unassigned offensive slots.
These aspects don't significantly alter the build, so you can equip them regardless of your current stats
Build Scaling Damage:
Cooldown Reduction (CDR) stands as a paramount factor for any Sorcerer build. What good are our skills if we can't utilize them due to being on cooldown? In purely offensive terms, CDR provides the following advantages:
More uptime on Unstable Currents (approximately a 4x damage buff).
Advertisement
Enhanced uptime on Vulnerable and Freeze from Frost Nova (leading to about a 2x damage buff).
Increased uptime on Barrier from Ice Armor or Protection, thereby activating Conceited and Storm Swell (a 1.62x damage buff).
Attack Speed (AS) holds immense importance for this build due to numerous reasons:
AS accelerates your attack speed, leading to more damage output and increased Lucky Hits.
It speeds up the ticking of your Ball Lightning, thanks to the Enhanced Ball Lightning upgrade.
More attacks result in more Glinting Arc Lash procs, offering similar benefits to CDR.
Critical Strike Chance (CSC) is crucial as it allows more frequent benefit from the 1.5x Crit multiplier, activating Enhanced Arc Lash. While CSC does not enhance Ball Lightning, it influences other aspects. However, in battles against multiple enemies, there's no distinction between 30% CSC and 100% CSC since Arc Lash will swipe twice either way. However, in single-target fights, every point of CSC makes a difference.
Subsequently, there are the typical damage stats: Weapon Damage, Intelligence, and various Additive Damage bonuses, prioritized in that order.
Lastly, Lucky Hit Chance (LHC) might seem crucial due to dealing around 55% of the build's damage through Lucky Hit procs. However, it's not the most vital. Focusing solely on Lucky Hit chance might enhance the build in AoE scenarios but weaken its performance against single targets. Approximately 35% of damage comes from Arc Lash, 30% from Ball Lightning, with the remaining 35% distributed among other Shock skills.
Advertisement
Build Scaling Defence:
Cooldown Reduction (CDR): Effective defensive skills are essential, yet they're only useful if we can actually cast them. For example, Frost Nova essentially offers 100% Close Damage Reduction against non-Bosses. Meanwhile, Flame Shield provides near invincibility, and Ice Armor amplifies this effect by tripling the duration at its best.
Barrier: Primarily derived from Ice Armor, this acts as our primary defense outside Nightmare Dungeons. Thanks to our consistent high damage output, the Barrier swiftly renews itself unless it's breached in a single hit.
Damage Reduction (DR): We aim to stack this as much as possible. Focusing on Damage Reduction from Close Enemies, and Damage Reduction from Burning Enemies in push variants, we secure these stats on Chests, Pants, Amulets, and some Paragon Boards. Achieving enough to fortify our Barrier against a single hit ensures greater ease; casting Ice Armor subsequently grants us six seconds without any concerns.
Armor serves as the primary source of Damage Reduction against Physical damage. Acquiring Armor naturally through high Item Power gear, we further boost it using Skulls in Jewelry and the Defensive Aspect of Disobedience. Reaching the Armor cap for the current monster level is crucial, as the last few points of Armor significantly improve its effectiveness.
Advertisement
Resistances contribute to damage reduction against Elemental damage. Similar to armor, stacking these as close to the cap as possible maximizes their effectiveness. As Sorcerers, we naturally gain Resistances from our high Intelligence and Paragon Boards, allowing us to almost reach the cap without compromising other gear stats.
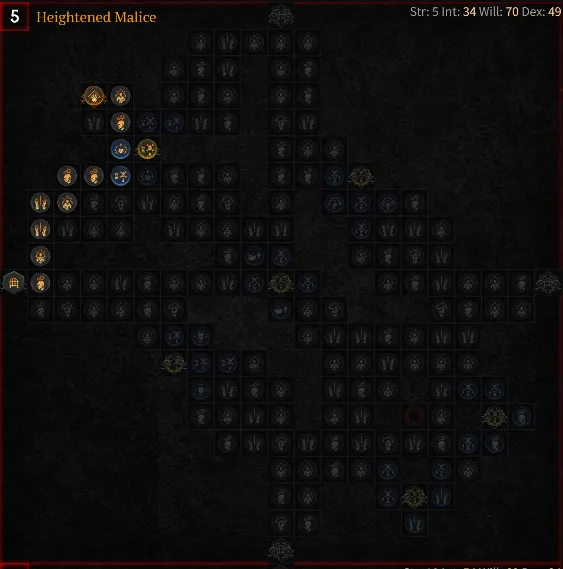
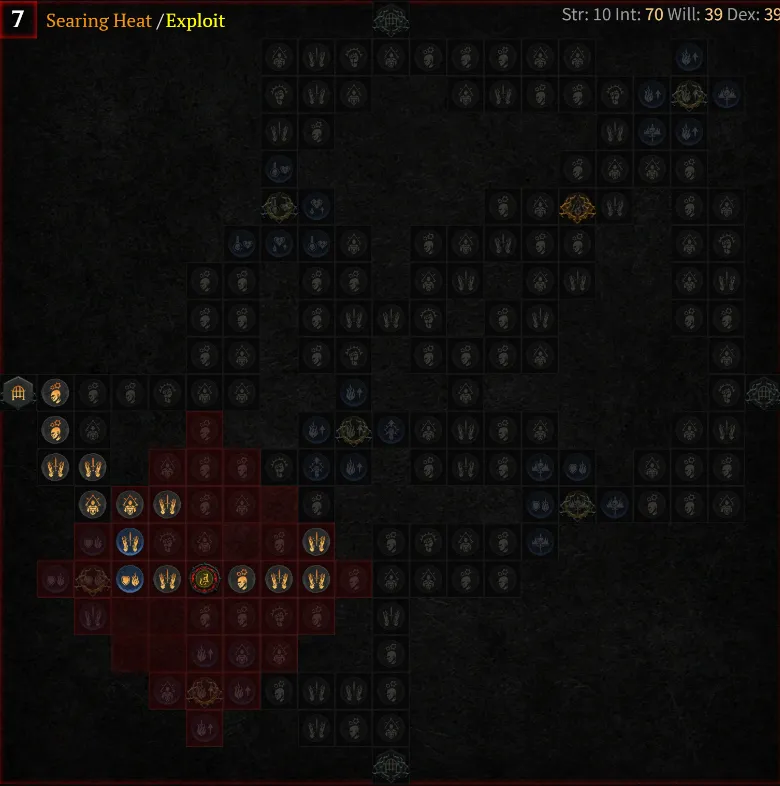
Paragon Board:
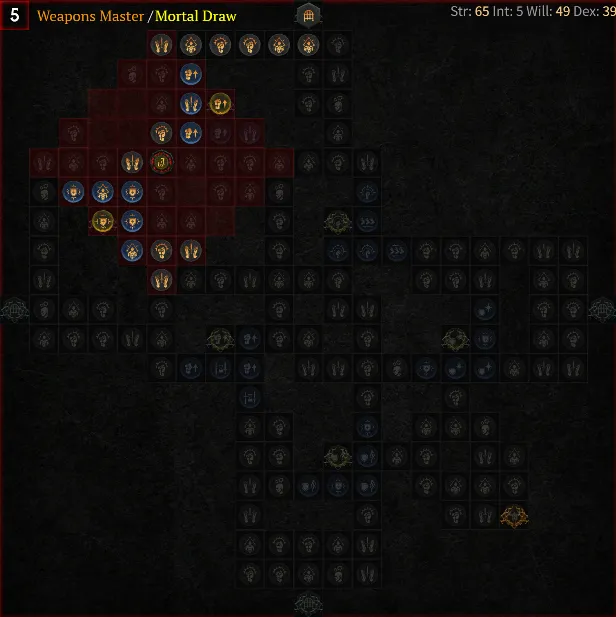
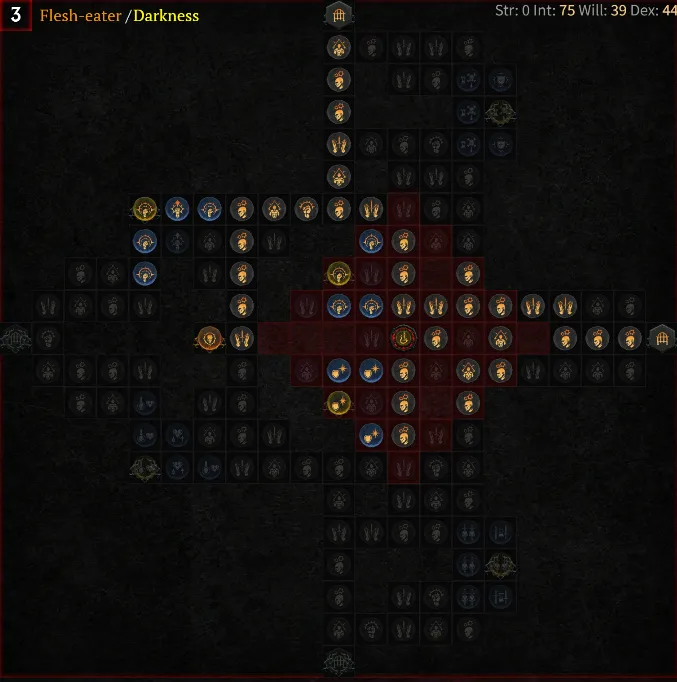
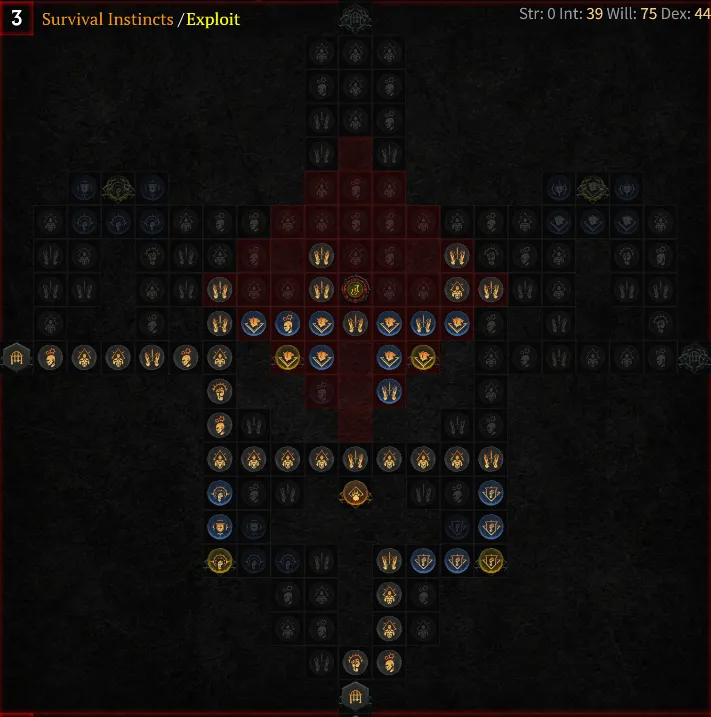
5. Infinimist Necromancer


Strength: 9
Dexterity: 7
Intelligence: 12
Willpower: 8
Our second Necromancer build, the Infinim Necro, is not a skill name, but rather a reference to the build's infinite sustain and durability. Here's how it works:
The build centers around the Aspect of Explosive Mist. When Blood Mist triggers a corpse explosion on nearby corpses, it reduces its cooldown by half a second. This mechanic is crucial in this build, as all the damage output is through corpse explosions. Being under the Blood Mist effect almost all the time grants a near-invulnerable status, making this one of the most survivable Necro builds in the game.
Advertisement
The Infinim Necro excels in massive area-of-effect damage but might face a slowdown when fighting bosses. It's also somewhat gear-dependent. If you're seeking a highly mobile Necromancer build, this stands as the most mobile option available.
Best-in-Slot Vampiric Powers:
Anticipation (Minor) - Enhances Bone Storm damage and its duration.
Prey on the Weak (Minor) - Amplifies Vulnerable damage and inflicts this status when an enemy is under a Vampiric Curse.
Domination (Minor) - Provides an additional damage multiplier.
Flowing Veins (Major) - Majorly enhances Damage over Time (DoT).
Metamorphosis (Major) - Grants Unstoppable upon Evading, inflicts damage, and applies Vampiric Curse to enemies encountered.
Skills:
Advertisement

Reap enables us to generate Corpses whenever necessary, enhancing our Damage reduction capabilities.
Decrepify is responsible for applying a potent crowd control effect.
Lucky Hit procs help in reducing Cooldowns on our Skills. Blood Mist stands as the foundation of the build, providing full Immunity, triggering Corpse Explosion, creating Corpses, applying Shadow Damage, and boosting our movement speed.
Corpse Tendrils serves as an exceptional crowd control tool and applies Vulnerable. Typically, only one Skill point is utilized, with additional ranks obtained from gear.
Bone Storm functions as a versatile skill, enhancing Damage, Survivability, and applying Shadow Damage on this build.
In dire situations, manually casting Corpse Explosion allows for swiftly stacking considerable damage, aiding in the continuous generation of Corpses to maintain the efficiency of this death-oriented strategy.
Passives:
Advertisement
The Shadowblight Key Passive takes the lead in this build. It not only amplifies our damage as long as we apply Shadow Damage at least once every two seconds but also acts as an instantaneous damage source that can achieve Critical Strikes. This significantly boosts our damage potential and allows us to focus on enhancing our gear with more damage stats for increased output.
Hewed Flesh serves as the core aspect of the build, providing the means to generate ample Corpses to fulfill our Corpse consumption requirements. By stacking a considerable amount of Lucky Hit Chance Bonus, this passive remains efficient, ensuring smooth functionality even with optimal gear.
Gloom and Terror contribute to adding damage, while Reaper's Pursuit increases our speed and Crippling Darkness aids in staggering bosses and crowd-controlling enemies during battles. The recent changes to Terror in Patch 1.2 have made it a viable multiplier for all Shadow Damage sources.
Book of the Dead:
It's essential to note that the Infinimist Necromancer has limited space on its Skill Bar for more abilities. Consequently, it chooses to sacrifice all three Minion options found in the Book of the Dead for their beneficial buffs. The priority lies in harnessing Shadow Damage from Skeletal Warriors, Vulnerable Damage from Skeletal Mages, and Critical Strike Damage from the Golem.
Advertisement
Endgame Gear:
In this configuration, you have access to all Unique items and Legendary Aspects, maximizing the efficiency of this build. To integrate them, certain adjustments are necessary.
Acquiring Howl from Below could occur early in your end-game progression, as it's a reasonably common drop. The Aspect previously equipped on your Gloves, along with the gear Affixes, was either of low value or sufficiently substituted by the Affixes on Howl from Below.
However, obtaining X'Fal's Corroded Signet may require targeted farming from Duriel, unless you are very fortunate. This single ring has the potential to almost double our efficiency and damage output. To attain this benefit, it's advisable to replace Aspect of Grasping Veins.
Build Scaling Damage:
Critical Strike Chance: Remember that the base 20% damage proc of Shadowblight can Crit. Additionally, the Offensive Aspect of Decay eventually increases those procs to deal extra damage, making it crucial to optimize your Crit Chance for amplified damage.
Vulnerable: We induce Vulnerable procs with Corpse Tendrils. This ability can be consistently spammed in combat, effectively applying Vulnerable to Bosses, making it a highly valuable status effect.
Crowd Controls: Given that all our damage occurs in an area, manipulating enemy positioning and grouping becomes a direct damage amplifier. This strategy also enables us to benefit from the "Damage to CC'ed Enemies" affix when Decrepify, Corpse Tendrils, or Crippling Darkness is used.
Advertisement
Attack Speed: Increased Attack Speed enhances the speed at which we can execute our skills, reducing the time before Tendrils and swiftly triggering Blood Mist. This stat holds significant value for the build's performance.
Shadow Damage Over Time: With the 1.2 Patch update, Shadow DoT damage has gained prominence, as it directly multiplies your Shadowblight damage. Focusing on your DoT damage and direct damage sources becomes pivotal in maximizing your build's effectiveness.
Build Scaling Defence:
Avoid Getting Hit: Leverage your ranged advantage and crowd control (CC) abilities to engage enemies from a distance. Move in and out of your attack range, dodging incoming projectiles.
Armor: A significant portion of your defense comes from your Armor. The Aspect of Disobedience enhances its effectiveness. Maximize the amount of Armor on your gear for increased protection.
Unstoppable/Immune: With infinite Blood Mist, you gain continuous immunity. Cooldown Reduction ensures that this defensive ability is available more frequently.
Damage Reduction from Enemies Affected by Shadow Damage over Time: Although it has a lengthy name, this defense is incredibly valuable, offering reliable Damage Reduction.
Resistances: Aim to reach a minimum of 70% resistance at World Tier 4 for most content. When tackling specific bosses and endgame challenges, utilize Max Resistance effects from Elixirs and gear to reach the 85% cap.
Advertisement
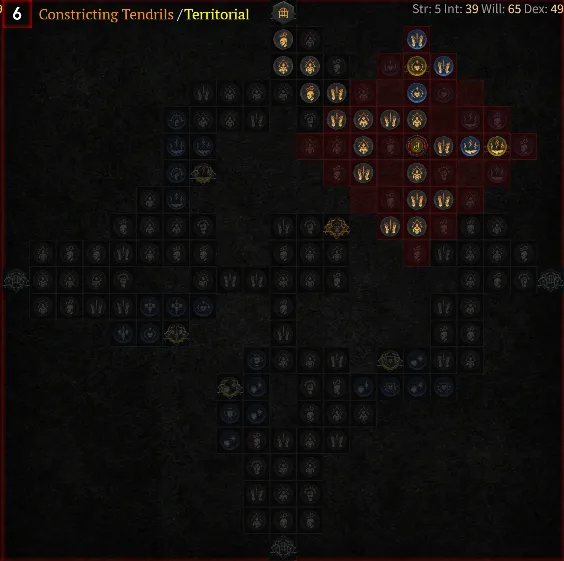
Paragon Board:

Advertisement
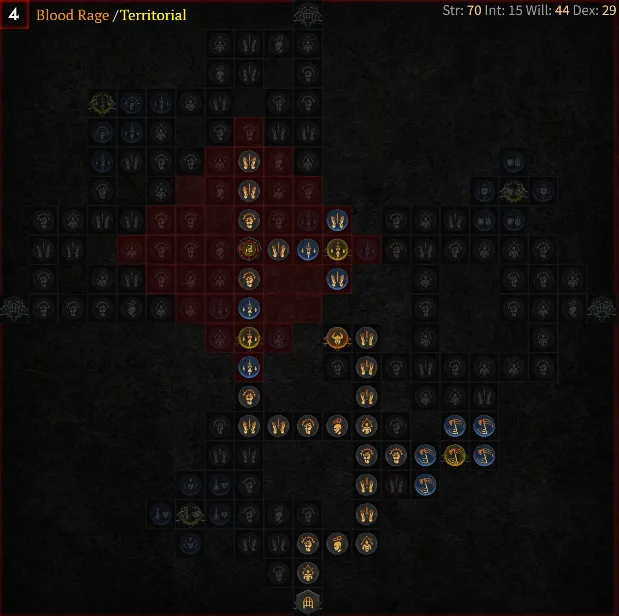
4. Hammer of the Ancients Barbarian


Strength: 10
Dexterity: 8
Intelligence: 7
Willpower: 7
Hammer of the Ancients represents a melee area-of-attack build that greatly benefits from the recent overpower buffs this season. Additionally, the new unique items are well aligned with overpower synergies, empowering the build to deliver devastating blows. This build's potential is evident even with minimal gear. Nevertheless, acquiring the essential Aspect of Ancestral Force can significantly improve its performance. You can unlock this aspect by completing the Sunken Ruins and adding it to your codex, substantially amplifying the area of impact for the Hammer of the Ancients.
Advertisement
Best-in-Slot Vampiric Powers:
Accursed Touch (Major) This is a Lucky Hit-based power that applies the Vampiric Curse, with a chance to spread it to other foes.
Metamorphosis (Major) This ability provides Unstoppable, generates Fury, and acts as another source of the Vampiric Curse. It also ensures a constant uptime on Tibault's Will when used effectively.
Ravenous (Minor) A significant Attack Speed boost, allowing quicker build-up of Overpowers and smoothing out the build's playstyle.
Prey on the Weak (Minor) When combined with our other abilities, this is our primary method of inflicting the Vulnerable status on enemies.
Sanguine Brace (Minor) This tool enhances defense by generating Fortify and also increases Critical Strike Chance.
Advertisement
Skills:
Bash is the preferred Fury-generating skill, essential for employing Aspect of the Expectant and enabling us to Overpower effectively
Hammer of the Ancients stands out as a heavy-hitting core skill, albeit with a moderately high Fury cost. Pairing it with Enhanced Hammer of the Ancients helps regain Fury, and adding Furious Hammer of the Ancients intensifies its power, delivering more lethal attacks when our resources are full. The Offensive Aspect of Ancestral Force transforms this skill into an omni-directional shockwave, devastating most of the room.
Ground Stomp serves to unsettle enemies in the immediate area, causing them to either be Knocked Down or Stunned. It's a great defense mechanism, rendering affected enemies temporarily disabled, while also enabling us to capitalize on Stun-related damage boosts.
Rallying Cry is a crucial Shout that bolsters Movement Speed and Fury generation for the entire party. This increased movement speed optimizes positioning to strike as many monsters as possible with Hammer of the Ancients to gain more Fury.
Challenging Shout is a key defensive buff and provides Fury regeneration upon being hit. This is particularly valuable given our consistent melee proximity and Fury consumption when engaging with Hammer of the Ancients.
War Cry bestows our party with a substantial multiplicative damage boost, while also granting us Berserking for increased damage output and Movement Speed.
Passives:
Booming Voice improves the duration of our Shout Skills, allowing us to maintain their effects for longer periods. Raid Leader grants us passive healing based on percentages for each active Shout. Guttural Yell reduces the damage output of nearby enemies whenever we use any Shout Skill. Its effects are cumulative when multiple Shouts are activated.
Swiftness is chosen for its consistent Movement Speed enhancement, which proves beneficial across various situations. When under the influence of Berserking, Aggressive Resistance helps in reducing incoming damage. Prolific Fury significantly amplifies our Fury generation, providing a valuable boost. Pit Fighter offers a minor damage increase and some protection against ranged attacks.
Counteroffensive gives a small but significant damage boost, active primarily while Fortify is up, which should be most of the time. Heavy Handed multiplies the Critical Strike Damage when wielding a Two-Handed Weapon, such as a Mace in our case. Wallop synergizes with our abilities that induce Stun and Vulnerable, resulting in an additional damage increase.
Brute Force enhances our damage significantly whenever we achieve Overpowering hits. Unbridled Rage is a substantial damage multiplier. Although it has a downside, we can manage it effectively, especially when Shouts are on cooldown or during low-density battles
Advertisement
Endgame Gear:
In this stage, the build reaches its maximum potential, harnessing the power of all Legendary Aspects and Unique items. The journey to obtain these sought-after items may involve a significant grind.
At this final stage of the build, a few key changes occur:
Equip Tibault's Will and Godslayer Crown, optimizing the loadout for maximum efficiency. Several Aspects need repositioning. Start by placing Disobedience on the Amulet to better benefit from its Armor boost.
Edgemaster’s is positioned to replace Retribution. Ancestral Force is placed on a weapon, allowing Relentless Berserker's to take up the Gloves slot. Aspect of Might replaces Numbing Wrath for enhanced performance.
Build Scaling Damage:
Fury and Cooldown Reduction:
For the Hammer of the Ancients Barbarian build, managing Fury and Cooldowns is crucial. Maintaining Fury regeneration and cooldown reduction are essential for casting the powerful Hammer of the Ancients frequently.
Cooldown Reduction is primarily available on Helm and Amulet. Rings contribute to Resource Generation, and Boots and Amulet are sources of Fury Cost Reduction.
Weapon Damage:
In this build, the Two-Handed Bludgeoning Weapon's damage per second significantly influences the power of Hammer of the Ancients. Other weapon slots require a minimum item level of 725. However, weapon damage in these slots doesn’t impact the build's effectiveness.
Damage while Berserking:
Berserking greatly enhances damage, acting as a 1.25x multiplier when active. It's essential to keep Berserking up during combat. War Cry, Relentless Berserker's Aspect, and Wrath of the Berserker are ways to activate Berserking instantly.
Advertisement
Overpower:
A significant damage source providing a 1.5x damage boost when it occurs. Use Combat Bash and the Bone Breaker paragon node to ensure Overpower and increase damage through Brute Force.
Critical Strike Damage:
While not as critical as before, Critical Strike Damage can still be beneficial. This stat is included in various weapon rolls and can be obtained through items like the Royal Emeralds.
Vulnerable Damage:
Acts as a 1.2x damage multiplier. Focus on initiating combat with Exploit to inflict Vulnerable status for increased damage.
Damage from Stuns:
Utilize Ground Stomp to stun enemies and increase damage. Abilities like Wallop and the Two-Handed Mace Expertise also enhance damage against Stunned enemies.
Limitless Rage and Edgemaster’s:
These Aspects increase damage significantly when Fury is capped or overcapped, emphasizing the importance of resource management. Ancestral Force:
This Aspect specifically boosts the damage and area of effect of Hammer of the Ancients.
Build Scaling Defence:
Damage Reduction:
Challenging Shout is one of our primary sources of damage reduction. Boost its effectiveness by rolling + Ranks of this skill on our Chest Armor. We acquire diverse forms of damage reduction through gear rolls, including: Damage Reduction from Close Enemies Damage Reduction while Fortified Aggressive Resistance offers damage reduction while Berserking. Pit Fighter provides a slight amount of Distant Damage Reduction. If needed, Iron Skin combined with Aspect of the Iron Warrior can grant flat damage reduction. We stack damage reduction with our Shouts due to Guttural Yell.
Fortify:
When Fortified, we gain a base 10% damage reduction that can be increased further using Royal Sapphires in our Helm, Chest Armor, and Pants. Numbing Wrath generates Fortify consistently. The Vampiric Power, Sanguine Brace, serves as a reliable means to generate Fortify.
Armor:
Armor is a consistent form of damage mitigation, always in effect, reducing all incoming Physical damage by a percentage. High armor values are extremely beneficial.
Strength stat inherently provides Armor at a 1:1 ratio. Aspect of Disobedience increases total Armor by a percentage. Royal Skulls in Amulet and Rings add Armor, competing with gems granting Resistances. % Total Armor rolls are essential on non-Unique Helmet, Chest Armor, and Pants.
Unstoppable:
Enhanced Rallying Cry stands as our primary source. Additionally, Iron Skin combined with Aspect of the Iron Warrior aids in achieving Unstoppable. Unstoppable is crucial for avoiding or escaping various enemy Crowd Control effects.
Advertisement
Paragon Board:
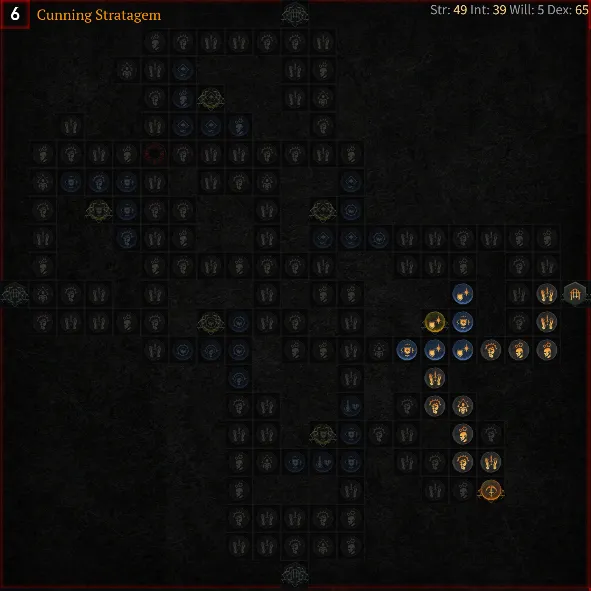
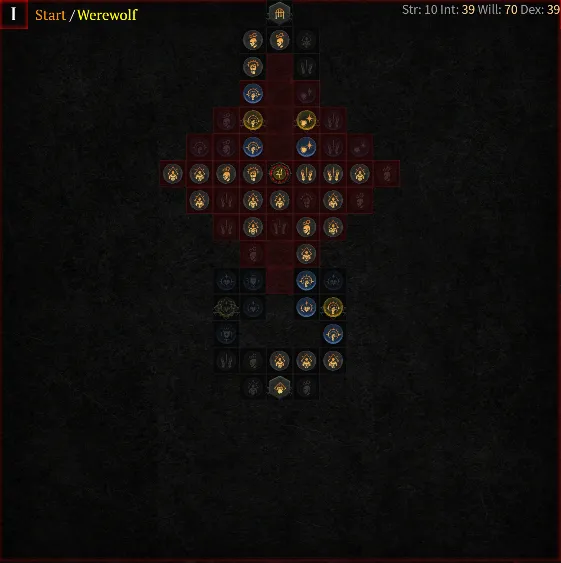
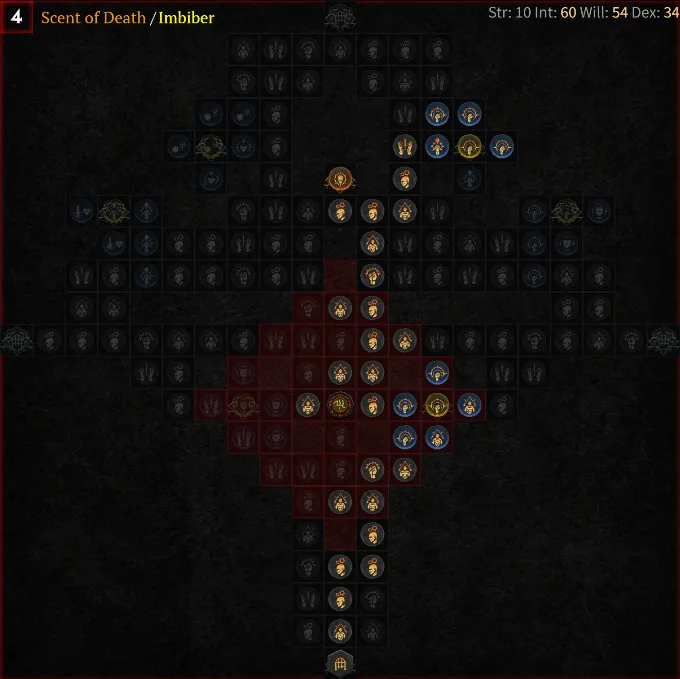
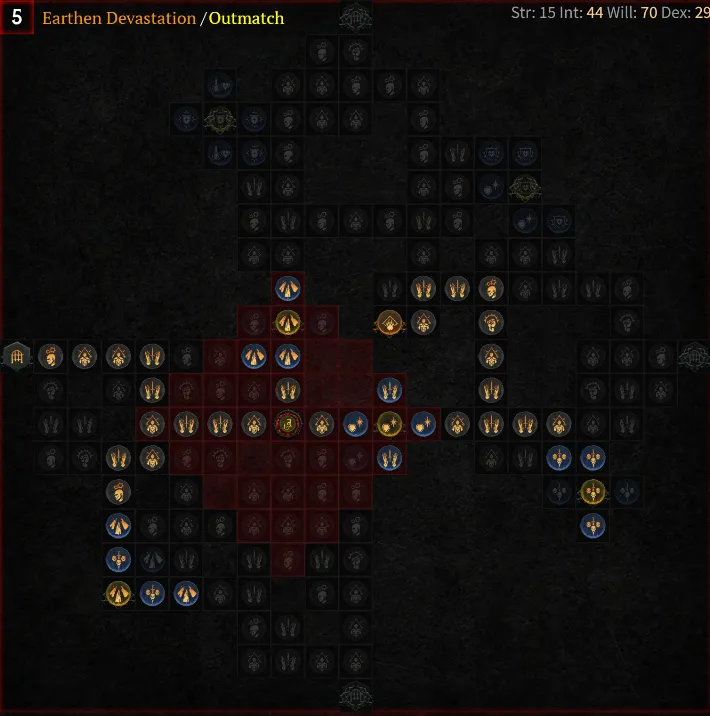
3. Pulverize Druid


Strength: 9
Dexterity: 7
Intelligence: 10
Willpower: 10
The Pulverize Druid build is incredibly robust, dealing significant damage with considerable range and coverage. It stands out as one of the top choices for Druids in the early, mid, and late game stages. A recent build guide for this powerful setup was posted earlier this week.
This build may have some challenges against single targets. However, with the shock wave aspect, it delivers impactful damage overall. It's simple to operate, making it beginner-friendly and accommodating due to its numerous defensive capabilities, including fortify and life maintenance. It ensures consistent uptime on Unstoppable, significantly reducing vulnerability to crowd control effects. For beginners, this is among the best recommendations, and even seasoned players will find it an outstanding choice.
Advertisement
Best-in-Slot Vampiric Powers:
Ravenous - This ability offers a substantial boost in attack speed without a high cost, prioritizing Movement Speed in our gear.
Anticipation - This power significantly enhances the uptime of Grizzly Rage, providing added damage and reducing damage taken for this build.
Blood Boil - Given the strong focus on Overpower, Blood Boil complements this build naturally.
Prey on the Weak - While offering a substantial damage boost, this power is more effective when combined with other Vampiric Powers to apply a consistent Vulnerable status, which is otherwise scarce in this archetype.
Accursed Touch - This power serves as our primary method to apply Vampiric Curse, triggering Vulnerable and other associated bonuses. Additionally, it amplifies the damage of Accursed Souls, which can be unleashed upon enemies by using either Earthen Bulwark or Debilitating Roar.
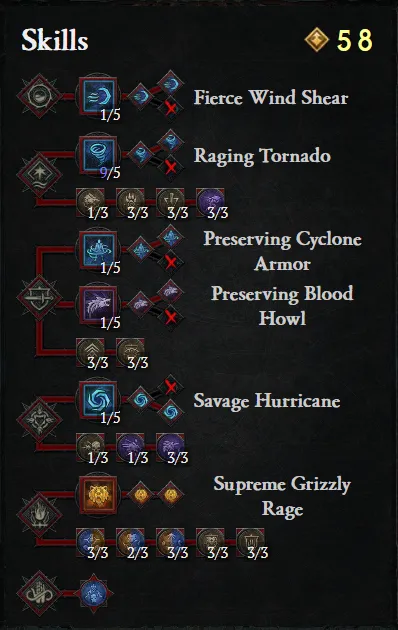
Skills:
Earth Spike is designed for generating spirit from a distance. Pulverize serves as your primary damage-dealing skill. By utilizing the Umbral and Quicksand combination, it also generates additional spirit.
Aim to strike multiple targets with this skill for maximum effectiveness! Grizzly Rage significantly amplifies damage output over its duration and provides a 6-second Unstoppable effect upon activation.
Earthen Bulwark creates a robust barrier and grants Unstoppable status for the duration of its effect. Debilitating Roar diminishes enemy damage within a wide range and can trigger Umbral effects through its slowing ability.
Trample is your key mobility skill, allowing you to break free from crowd control effects upon activation while restoring spirit.
Spirit Boons:
Druids can select up to 5 out of 16 Passive bonuses (Boons) from 4 unique spirits. To activate two Boons, bonding with a Spirit in Túr Dúlra is necessary. The remaining Spirits each grant only one Boon. Utilize the following Boons for optimal results:
Deer Spirit: Wariness Eagle Spirit: Scythe Talons Wolf Spirit: Calamity Snake Spirit: Calm Before the Storm
To activate Obsidian Slam, it's recommended to bond with the Snake Spirit.
Passives:
Selecting Ursine Strength as the Key Passive is vital for enhancing our damage output, especially due to the numerous guaranteed Overpowers within this build. Two fundamental sources of Overpower are embedded in our Skill tree, namely Provocation and Enhanced Pulverize.
Advertisement
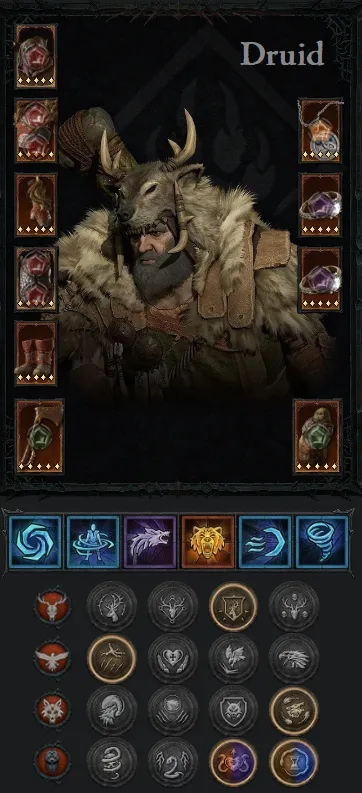
Endgame Gear:

In this configuration, you gain access to all Unique items and Legendary Aspects, maximizing the potential efficiency of this build. Let's explore the necessary alterations to incorporate them effectively.
Mending Stone will be replaced to accommodate Vasily's Prayer. If not already in place, equip Shockwave on your Weapon and Retaliation on your Amulet. Finding the right balance for resistances is crucial at this stage of your journey.
It's recommended to focus on Boots, Pants, and/or Chest Armor for resistance considerations. Consider using gems to bolster specific resistances that might be lacking, instead of Diamonds.
As you progress to level 93 or higher, utilizing the Late Game paragon board becomes viable. This, when combined with a high-level Outmatch Glyph and potent Item Power Jewelry, will allow you to cap all Resistances through Diamonds without the necessity for specific gear rolls.
Build Scaling Damage:
Overpower: This setup offers four surefire ways to trigger Overpower - Enhanced Pulverize, Provocation, Obsidian Slam, and Blood Boil. When activated, these moves boost damage dealt significantly, amplified further by Vasily's Prayer, Insatiable Fury, Dominate, and Ursine Strength. Given their importance, try to avoid using them up with your generator or Trample whenever possible.
Lucky Hit Chance: Our strategy heavily relies on Lucky Hit Chance, which helps in reducing the cooldown of Grizzly Rage through Calm Before the Storm, immensely increasing Attack Speed with Ravenous, and applying Vampiric Curse and Vulnerability using Accursed Touch.
Critical Strikes: Critical Strikes on their own provide a damage multiplier, further amplified by the Earthen Devastation Legendary node. This node encourages optimizing the damage bonus against Crowd Control enemies to 120% or more on gear, covered by the Oppress and adjacent Magic Nodes, the implicit effect on our Staff, and a single affix roll on a ring.
Vulnerable: Leveraging Exploit grants a 3-second window for increased damage due to Vulnerable, ample time to clear non-boss enemies. For prolonged battles, our reliance is on the combination of Accursed Touch and Prey on the Weak to maintain this damage boost.
Crowd Control: Each of your strikes slows enemies due to Quicksand. Employing Damage Affixes to deal additional damage against Crowd Controlled enemies on both your gear and Paragon Boards maximizes this advantage.
Positioning / Monster Stacking: The goal is to find the "sweet spot" where Pulverize and the Shockwave Aspect overlap when facing a single target.
Build Scaling Defence:
Avoid Taking Hits: Leverage your range advantage to attack enemies from a distance. By stepping in and out of your range, you can dodge most incoming projectiles.
Fortify: This build offers multiple ways to quickly attain the Fortified status. Enhance its effectiveness by incorporating Damage Reduction while Fortified into your gear and Paragon Boards.
Barrier: Although primarily used for Fortify and Unstoppable effects, Earthen Bulwark provides a moderate Barrier for a duration or until breached.
Armor: A significant part of your defense is provided by Armor. The Aspect of Disobedience significantly bolsters its effectiveness. Aim to maximize the Armor on your gear and Paragon Boards.
Unstoppable: There are several methods to achieve the Unstoppable status. The main goal is to maintain Grizzly Rage constantly. If that's not possible, Earthen Bulwark and Trample can serve as temporary solutions to obtain this status.
Resistances: Balancing resistances is crucial during leveling, involving your gear and jewelry sockets. However, the Late Game Paragon Board resolves this issue. Utilizing a high-level Outmatch Glyph, along with high-powered Jewelry, allows capping resistances using Royal Diamonds, Vigilance, Ancestral Fortitude, and intelligence-based passive bonuses.
Advertisement
Paragon Board:
Advertisement
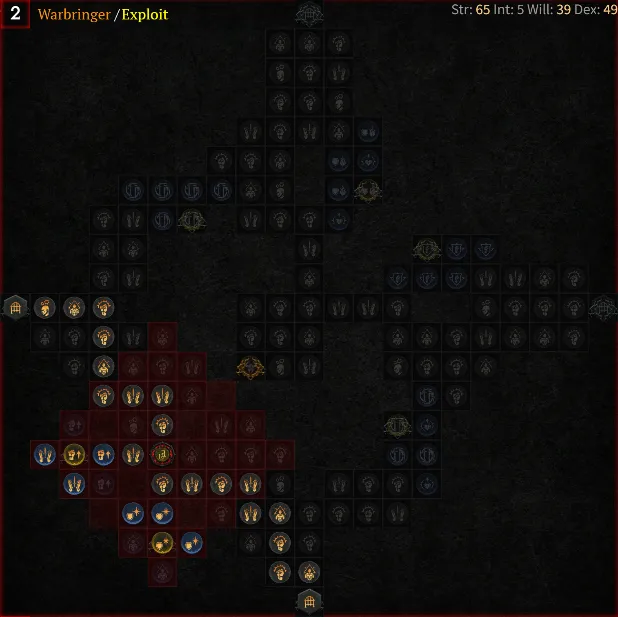
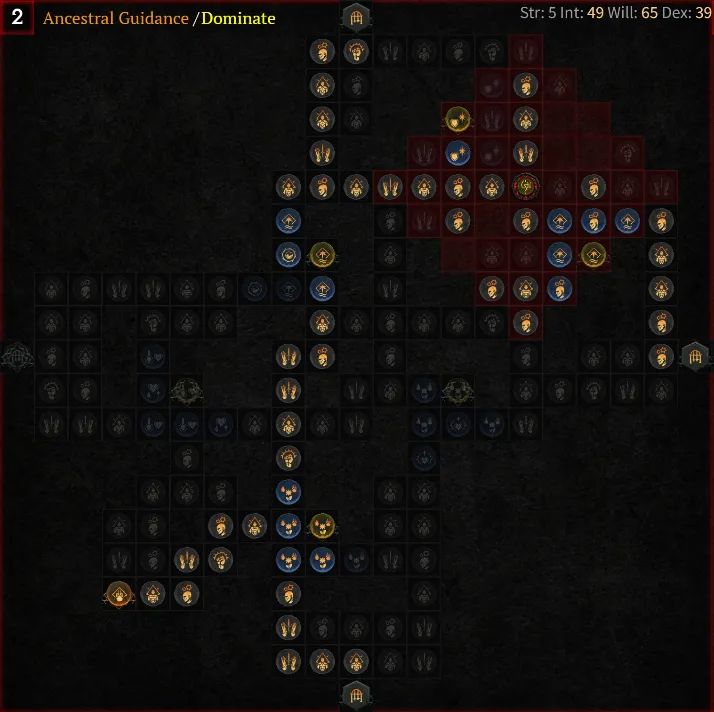
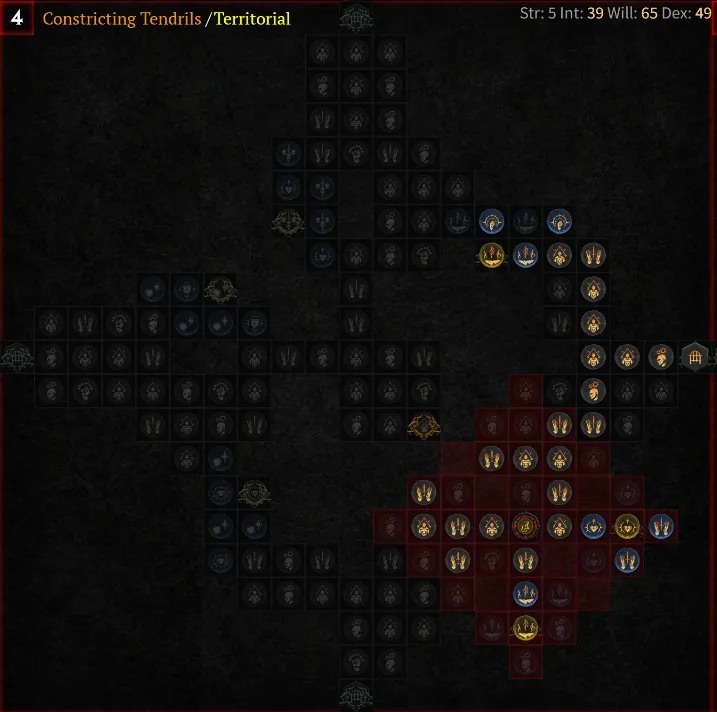
2. Twisting Blades Rogue


Strength: 7
Dexterity: 10
Intelligence: 7
Willpower: 8
Twisting Blades has consistently held its place as the top-tier Rogue build, offering unparalleled speed and a dynamic playstyle. The build excels in both area clearing and boss takedowns, allowing players to zip across the screen swiftly and delivering a satisfying gaming experience. However, it's important to note that this build isn't recommended for beginners; it requires a high level of skill and understanding due to its fragility - typical of a rogue character. The challenging nature of this build provides rewarding gameplay, enabling players to see visible improvements in skill, ultimately resulting in a satisfying gameplay experience.
Best-in-Slot Vampiric Powers:
Advertisement
Accursed Touch (Major) - Initiates and propagates the Vampiric Curse for additional effects.
Prey on the Weak (Minor) - Maintains a high Vulnerable duration, elevating our damage.
Moonrise (Major) - Supplements additional Attack & Movement Speed to the configuration.
Ravenous (Minor) - Consistently provides a significant boost to Attack Speed for increased damage output.
Hemomancy (Minor) - Occasionally inflicts area-of-effect damage and offers healing.
Skills:

Puncture serves as our primary Basic Skill for both accumulating Energy and administering Slow & Vulnerable to foes.
Twisting Blades stands as our key ability. This skill involves embedding two knives into the enemy, drawing them back from the enemy's location after 1.5 seconds.
This action is complemented by the Bladedancer's Aspect, enabling a strong combination of single target and area-of-effect (AoE) damage.
Dash and Shadow Step offer exceptional mobility, allowing swift movement across the battlefield. Shadow Imbuement significantly aids in clearing enemy packs and replenishing Energy through Consuming Shadows.
Our secondary Imbuement, Poison Imbuement, focuses on delivering substantial single-target damage against elite adversaries and bosses.
Endgame Gear:
In this configuration, you gain access to all Unique items and Legendary Aspects, significantly enhancing the efficiency of this build. Let's delve into the adjustments necessary to integrate these elements.
Please Note: Presently, the "Maximum Resource" statistic on Tibault's Will provides additional maximum Combo Points, substantially amplifying your Core Skill's damage output. When combined with Condemnation, it swiftly fills all Combo Points (up to 23) with a single activation, unleashing high burst damage.
While this is currently an exploit that is anticipated to be addressed soon, if you possess both these items, you can exploit this combination, deviating from the standard setup provided here.
For instance, consider replacing Ravenous, Accelerating, Corruption, or Inner Calm based on your setup.
Tibault's Will is our primary unique choice due to its easy triggering, resulting in a significant damage spike. If you find yourself too vulnerable, a legendary item can serve as an alternative.
Alternatively, consider incorporating Penitent Greaves and obtaining Frigid Finesse, granting free Chill effects triggering Energy recovery from The Umbral. However, this modification necessitates dropping either Ravager or Ghostwalker.
If you haven't obtained gloves with "Lucky Hit: Chance to Slow," aim to acquire these to aid in activating the damage reduction from Paragon nodes present on the Cheap Shot board.
It's important to note that equipping unique items may require adjusting Resistances to maintain their cap in different slots.
Build Scaling Damage:
Damage to Crowd Controlled Enemies: Utilizing Close Quarters Combat transforms this statistic into a formidable damage amplifier.
Advertisement
Combo Points: Utilize Combo Point Specialization to employ Puncture up to 3 times, amplifying the power of your subsequent Twisting Blades. Accumulating Combo Points ensures ample Energy for the Edgemaster’s Aspect.
Energy: Continuous Twisting Blades use may improve gradually as we advance, notably through Resource Generation rolls on Rings, and the assistance of the Ravenous Aspect and Aspect of the Umbral.
Critical Strikes: Enhance your Critical Strike Chance through various means, including enhancements on Gloves & Rings and Intelligence.
Vulnerable: We inflict this debuff through a variety of methods, including Puncture, Blended Shadow Imbuement, and the Exploit Glyph.
Mobility: Enhanced tools and increased Movement Speed extend the reach and impact of each individual Twisting Blades use, allowing for longer flights and more effective strikes.
Build Scaling Defence :
Resistances: As we progress towards the late game, our focus is on reaching the 70% cap for all elemental resistances. We achieve this through rolls on Armor pieces, Paragon nodes, and Jewelry sockets.
Armor: Similar to our approach with resistances, our goal is to hit the 85% damage reduction cap for armor. This helps us maintain a strong defense against various types of damage, such as ~9200 versus level 100 monsters and ~13500 versus level 154 monsters.
Crowd Controls: To control the battlefield, we employ Twisting Blades to Daze our primary target and then propagate this effect through Shared Misery.
Defensive Legendaries: Among our defensive tools, Disobedience stands out as one of the most potent defensive aspects. This aspect has a high uptime in this build, further amplified by the effects of Cheat's and Might.
Advertisement
Paragon Board:
Advertisement
1. Ball Lightning Sorcerer


Strength: 7
Dexterity: 7
Intelligence: 10
Willpower: 8
The number one build is the Sorcerer Ball Lightning. This build has surprisingly gained immense popularity. But why is this build becoming so popular? It's a blend of new vampiric powers, which reduce the cooldown of the ultimate, along with buffs to various passive and active skills in the latest patch, Sorcerers Patch 1.2. Moreover, a new bug in ball lightning, confirmed by the developers not to be patched, has made it a legitimate build for this season.
The build allows a consistent uptime on the ultimate unstable currents. This enables the casting of a shock skill each time a shock skill is cast. This creates a looping effect where casting ball lightning triggers more ball lightning and further triggers crackling energy. The crackling energy restores your Mana, allowing for rapid energy regeneration. Since ball lightning is a mana-intensive skill, the quick energy replenishment enables constant and repeated casting. In essence, it's Diablo's version of relentless ball lightning spamming. This season's standout build exceeds its normal damage output by threefold due to an existing bug. If you wish to experience the might of boundless Arcane power before it's fixed—because it most certainly will be—this season is the time for Sorcerers to run it.
Advertisement
Best-in-Slot Vampiric Powers:
Ravenous (Minor) - Provides a considerable Attack Speed boost for free. Highly beneficial for non-channeling builds.
Anticipation (Minor) - Cuts down the cooldown of Unstable Currents by 20%, which happens to be our most crucial cooldown skill.
Metamorphosis (Major) - Triggers the Vampiric Curse and grants Unstoppable, leading to a damage bonus and Mana via Tibault's Will. Note: Keeping this power at level 1 is recommended to activate the Mana restoration effect more frequently.
Prey on the Weak (Minor) - When used alongside Metamorphosis, this applies Vulnerable to enemies and offers a constant damage bonus.
Domination (Minor) - A supplementary Aspect Control skill that adds an additional execute.
Advertisement
Skills:
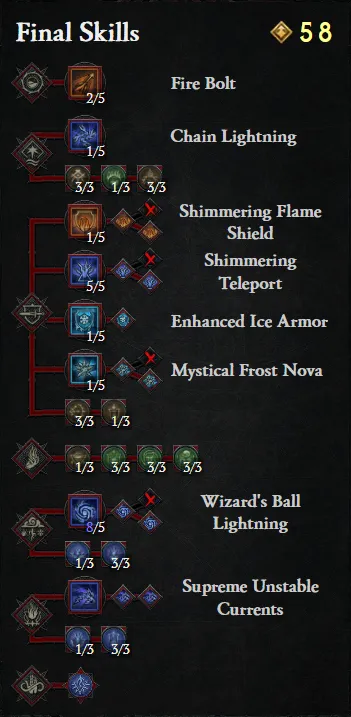
Ball Lightning serves as our primary damage-dealing skill and generates abundant Crackling Energy through Wizard's Ball Lightning.
Unstable Currents is responsible for providing a substantial damage boost while active.
Teleport not only acts as our mobility skill but also functions as a crowd control break, and it has the ability to pull and stun enemies with Raiment of the Infinite.
Frost Nova is excellent for applying Freeze and Vulnerable to enemies, significantly amplifying our overall damage output.
Ice Armor supplies a substantial Barrier and a minor mana regeneration effect.
Flame Shield further bolsters our defenses and also contributes some healing.
We allocate a single point to Chain Lightning to access its Enchantment, while Fire Bolt primarily serves to unlock the remaining parts of the Skill Tree.
Passive Skills:
In addition to standard damage and damage reduction abilities, we acquire Invigorating Conduit to aid in managing Mana.
When casting Lightning Spear with Unstable Currents, Conjuration Mastery becomes active.
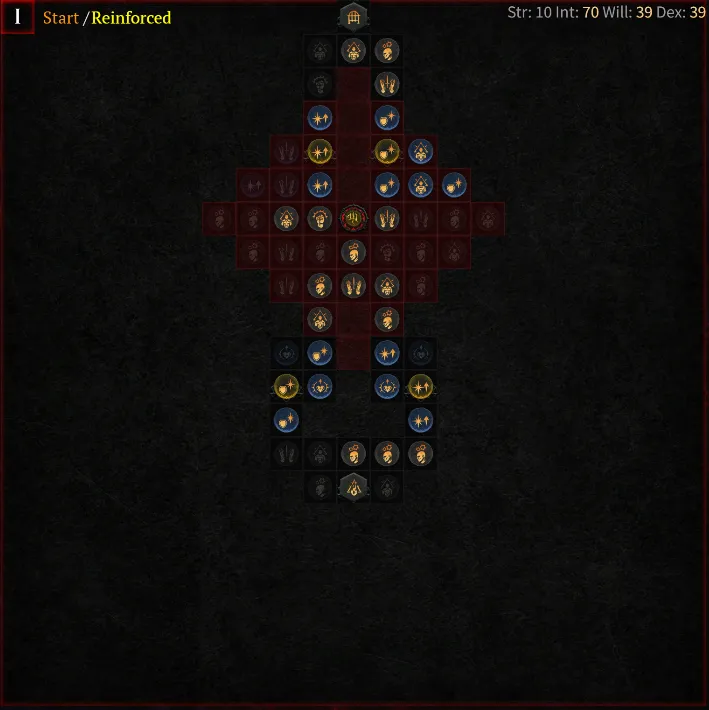
Endgame Gear:
Advertisement

In this setup, you'll have access to the most potent version of this build with all Legendary Aspects and Unique items. Expect to invest some time to obtain these highly sought-after items.
In the ideal build, we incorporate four Unique items: Raiment of the Infinite Flickerstep Tibault's Will Godslayer Crown As our defensive slots are filled, we need to relocate Disobedience to the Amulet and Gravitational elsewhere, removing Control. Upon acquiring Tibault's Will, you can reinstate Control and remove Prodigy's.
If you possess well-rolled (290%+) Fists of Fate, you can use them in place of Control. This substitution may slightly reduce damage but lessens your reliance on Crowd Control.
Build Scaling Damage:
Cooldown Reduction (CDR) is a key stat for every Sorcerer build. What's the use of your skills if they're often on cooldown?
CDR provides the following offensive benefits: Enhanced Unstable Currents uptime (doubling damage output) Increased uptime on Freeze and Vulnerable from Frost Nova (about 1.8x damage boost) Extended uptime on Barrier from Ice Armor or Protection with Conceited and Storm Swell (1.62x damage boost) Mana is crucial in our philosophy of skill usage.
To spam Ball Lightning with high attack speed, you'll need abundant stats. Focus on Mana Cost Reduction and Resource Generation to maximize your potential.
Attack Speed is a vital factor in increasing your DPS by allowing quicker casting of Ball Lightning. It also amplifies the tick rate of Ball Lightning via Enhanced Ball Lightning.
Additional Offensive Stats. Prioritize normal offensive stats such as Ball Lightning Ranks, Weapon Damage, Critical Strike Chance, Intelligence, and all forms of Additive Damage.
Advertisement
Build Scaling Defence:
Cooldown Reduction (CDR): Similar to offensive skills, the effectiveness of our powerful Defensive Skills heavily relies on our ability to cast them regularly. For instance, Frost Nova offers nearly 100% Close Damage Reduction against non-Boss enemies, while Flame Shield acts as an almost invulnerable protective shield. Ice Armor, offering triple the duration of Flame Shield, serves as our primary defense outside Nightmare Dungeons.
Barrier: Primarily derived from Ice Armor, Barrier is a pivotal defense mechanism. It instantaneously refreshes as long as it remains unbroken in a single hit, predominantly maintained by our consistent and potent damage output.
Damage Reduction (DR): Our focus is on maximizing various forms of Damage Reduction, including stats like Damage Reduction from Close/Distant Enemies and Damage Reduction from Burning Enemies. These attributes are commonly found on Chests, Pants, Amulets, and some Paragon Boards. With substantial stacking of these stats, enabling our Barrier to endure a hit makes our strategy relatively effortless. Casting Ice Armor then ensures no worries for the next 6 seconds.
Armor: Serving as the primary source of Damage Reduction against Physical damage, Armor naturally increases with high Item Power gear. This is further enhanced through Skulls in Jewelry and the Defensive Aspect of Disobedience. Hitting the Armor cap becomes extremely crucial, as the effectiveness of the last few points of Armor grows significantly.
Resistances: To mitigate Elemental damage, stacking Resistances close to the cap is essential for full effectiveness. As a Sorcerer, our high Intelligence and Paragon Boards provide numerous Resistances, enabling us to almost reach the cap without compromising any other gear stats.
Advertisement
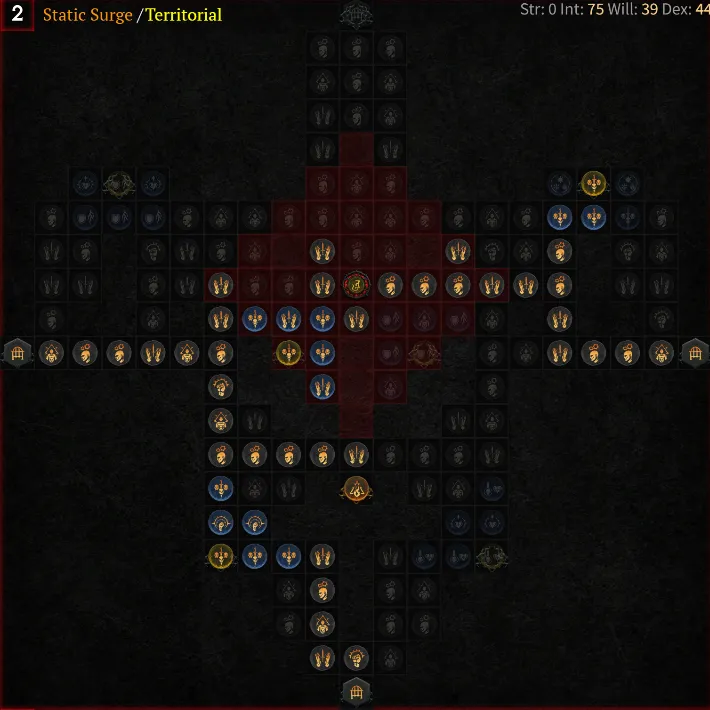
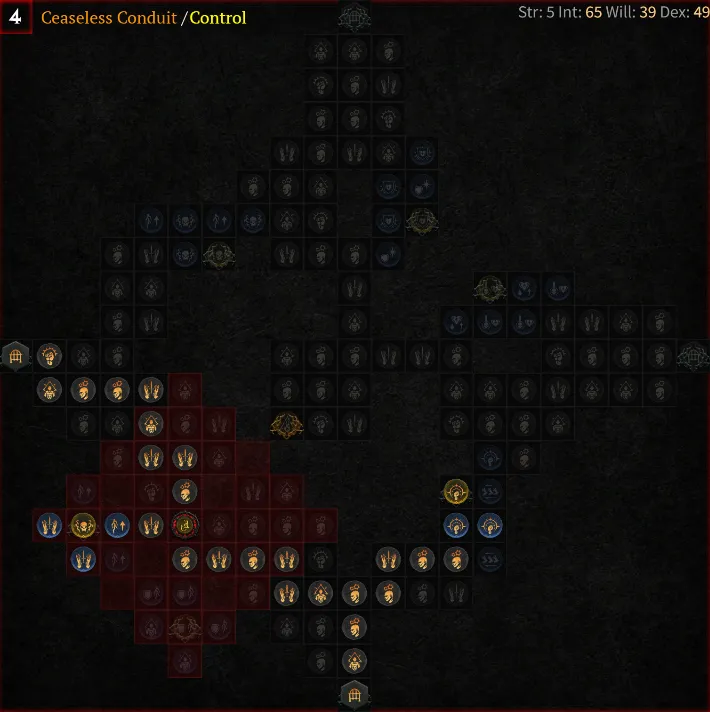
Paragon Board:

Advertisement
These top 10 Diablo 4 builds provide remarkable versatility and effectiveness, catering to diverse preferences and playstyles of gamers within the ever-evolving world of Sanctuary.
From the relentless onslaught of the Hammer of the Ancients Barbarian to the precise and lethal strikes of the Twisting Blades Rogue, the Season 2 meta presents a diverse selection of character builds. Each build offers unique mechanics and synergies, whether it's the strategic use of Vampiric Powers, the manipulation of powerful skills and abilities, or the optimization of endgame gear.
The Ball Lightning Sorcerer emerges as a standout due to its potent exploitation of existing bugs, offering immense power and efficiency. This controversial yet popular build delivers unparalleled damage output, providing players with a taste of boundless Arcane might before the inevitable patch adjustments.
The Pulverize Druid's robustness, the Hammer of the Ancients Barbarian's devastating area-of-effect potential, and the dynamic mobility and damage output of the Twisting Blades Rogue highlight the diversity and depth of build options available in Season 2.
As players venture through the dark, treacherous landscapes, the exploration and adoption of these top 10 builds offer thrilling opportunities for conquering foes, delving into dungeons, and mastering endgame challenges. Whether seeking sheer power, strategic depth, or a mix of both, Season 2 provides an arsenal of character builds waiting to be harnessed by seasoned and aspiring heroes alike.
Advertisement
Advertisement